Tesla Model 3/Y Front Bumper Removal: DIY Guide
Quick-Reference Snapshot
| Spec | Detail |
|---|---|
| Difficulty | Medium — no special skills, but fragile clips and connectors |
| Time (first attempt) | 30–60 minutes |
| Time (experienced) | 15–20 minutes |
| Total fasteners | ~25–35 depending on model year |
| Tools required | T20, T25, T30 (T40 on Highland), 10mm socket + 6–8" extension, trim tools |
| Upper bolts (under frunk) | 4–6 × 10mm, torque to 8–10 Nm on reinstall |
| Underbody screws | 4–6 × T30 Torx (T40 on 2024+ Highland), torque to 2–3 Nm |
| Hidden bolts | 1 × 10mm per side behind wheel well liner — the #1 missed fastener |
| Spare clips needed | Yes — buy a replacement push-clip set before starting |
| Helper recommended | Yes — the bumper is large and still wired when the clips release |
| Cost saved vs. shop | $150–$350 in labor |
| Models covered | Model 3 (2017–2026), Model Y (2020–2026), Model 3 Highland (2024+), Model Y Juniper (2024+) |
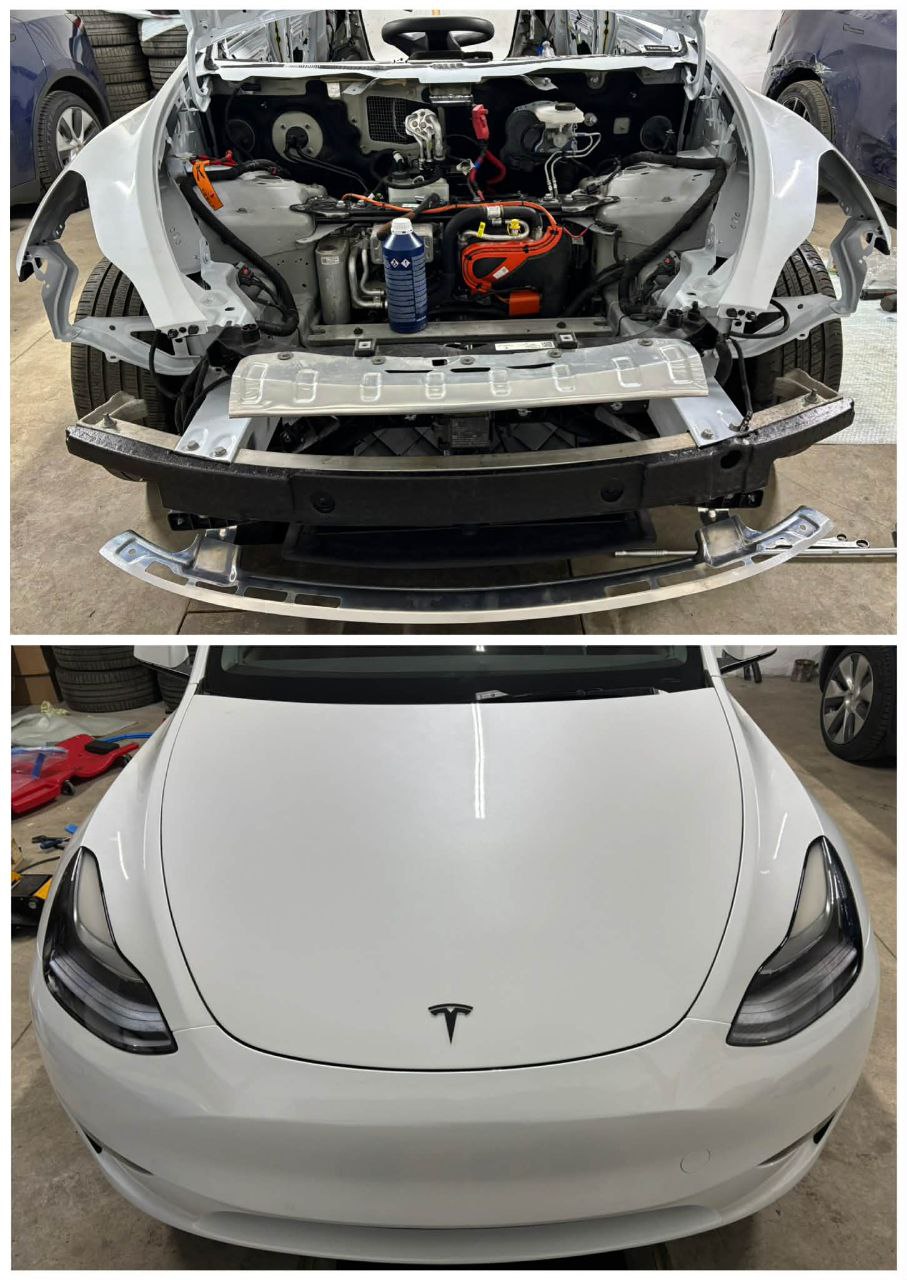
Removing the front bumper on a Tesla Model 3 or Model Y is one of those jobs that looks intimidating but is actually straightforward once you know where every clip, screw, and bolt hides. The bumper fascia is a single large plastic piece held on by a combination of Torx screws, 10mm bolts, and push-pin clips — no special Tesla tooling required.
This guide covers the 2017–2023 Model 3 (pre-Highland), the 2020–2024 Model Y, the 2024+ Model 3 Highland, and the 2024+ Model Y Juniper. The process takes about 30–60 minutes your first time, and under 20 minutes once you've done it before.
Table of Contents
- Why Would You Remove the Front Bumper?
- Repair Dependency Matrix
- Difficulty Rating
- Tools You'll Need
- Before You Start
- Step-by-Step Removal
- Electrical Connector Quick Reference
- Fastener Map: Quick Reference
- Fastener Torque Specifications
- Model Y vs. Model 3: Key Differences
- Pre-2021 vs. 2021+ vs. 2024 Highland vs. 2024+ Juniper
- Reinstallation: Step-by-Step Procedure
- What to Inspect While the Bumper Is Off
- Workshop Case Studies
- Buying a Replacement Bumper Fascia
- Tesla OEM Part Numbers and VIN-Specific Sourcing
- Cold Weather Removal Considerations
- Troubleshooting: Bumper Won't Come Off?
- Cost Comparison: DIY vs. Professional
- Common Mistakes to Avoid
- When to Call a Professional
- Post-Reinstall Fault Codes and How to Clear Them
- Frequently Asked Questions
- Related Guides
Why Would You Remove the Front Bumper?
There are plenty of reasons you might need the bumper off:
- Paint repair or touch-up — Access to the full surface for proper paint chip repair or respray
- PPF installation — Many PPF installers wrap bumpers off the car for a cleaner result with no edges lifting
- Fog light or turn signal replacement — The fog light assemblies sit behind the bumper fascia and cannot be accessed from the front
- Parking sensor replacement — Ultrasonic parking sensors (USS) clip into the bumper from behind on pre-HW4 vehicles; see our parking sensor replacement guide for what to expect
- Front radar module access — The forward-facing radar sits behind the lower bumper area; removal is required if you suspect radar damage or misalignment
- Headlight removal — You need the bumper off to access headlight mounting bolts for a full headlight replacement
- Tow hook access — A tow hitch installation sometimes requires bumper removal or partial detachment depending on the kit
- Collision repair — Minor fender bender? The bumper fascia is often the only damaged part and costs $400–$800 in paint plus labor
- Aftermarket bumper installation — Upgrading to a performance or custom fascia
- Scratch or dent repair — Having the bumper off-car gives a dent repair technician full access to the rear surface
Repair Dependency Matrix: When You Need the Bumper Off
Before starting any Tesla front-end repair, confirm whether the job requires full bumper removal, a partial swing-out, or no removal at all. This determines your time budget and whether to buy spare clips in advance.
| Repair Job | Bumper Required? | Notes |
|---|---|---|
| Front headlight replacement | Full removal | Mounting bolts are behind the fascia |
| Fog light / DRL replacement | Full removal | Assemblies clip into the fascia from the inside |
| Ultrasonic parking sensor (USS) replacement | Full removal | Sensors press-fit into bumper from behind |
| Front radar replacement / recalibration | Full removal | Radar module sits center-lower behind fascia |
| EPP foam crash absorber replacement | Full removal | Foam sits between beam and fascia |
| Front bumper beam replacement | Full removal | Beam is behind the fascia |
| PPF installation (full front) | Full removal recommended | Wrap quality is significantly better off-car |
| PDR / dent repair on bumper face | Full removal recommended | PDR tech needs full rear-surface access |
| Headlight condensation seal repair | Full removal recommended | Easier access to headlight-to-bumper foam seal |
| AC condenser cleaning (debris removal) | Partial swing-out | 2–4 inches is enough for debris access |
| Wiring harness clip replacement | Partial swing-out | One-side partial access is sufficient |
| Front frame rail inspection | Full removal recommended | Full view of crumple zones and frame ends |
| Paint work on bumper surface | Full removal recommended | Professionals prefer off-car for edge work |
| Touch-up on small chips (bumper face) | Not required | Access from front without removal |
| Tow hitch installation | Varies by kit | Most Tesla OEM tow hitch kits do not require bumper removal; check your specific kit instructions |
Planning rule: If two or more "Full removal" jobs are on your list, plan a single removal session that covers all of them. Removing the bumper twice doubles clip break risk and doubles time. Combine the fog light replacement, USS sensor check, and front frame inspection into one session while you're in there.
Difficulty Rating
Medium — No special skills needed, but you're working with fragile plastic clips and electrical connectors. A helper makes the final pull-off easier. If you've done basic automotive work before, this is well within your ability.
Time estimate: 30–60 minutes (first time) · 15–20 minutes (experienced)
Tools You'll Need
Here's what to have ready before you start:
| Tool | What It's For |
|---|---|
| Plastic trim removal tools | Popping push clips without breaking them |
| T20, T25, T30 Torx bits | Wheel well liner screws, upper bumper screws |
| T40 Torx bit | Underbody fasteners on 2024+ Highland and Juniper |
| 10mm socket + ratchet | Bolts behind wheel arch liner and along bumper top |
| Ratchet extension (6–8") | Reaching the hidden recessed bolt behind each fender liner |
| Painter's tape | Protecting fender edges from scratches during removal |
| Moving blanket or soft cloth | Setting the bumper down without scratching the painted surface |
| Flashlight / headlamp | Seeing into wheel wells and under the car |
| Spare push clips | Clips break — buy extras before you start |
| Helper | Holding the bumper once the side clips release |
Pro tip: Order a pack of OEM-spec replacement push-pin clips before the job begins. They cost $10–$15 and at least one or two will break during removal. Not a question of if, but which ones.
EU/DE readers: trim tools on Amazon.de · Torx set on Amazon.de · replacement clips on Amazon.de
Before You Start
- Park on a flat surface with plenty of room in front of the car. You'll need space to set the bumper down.
- Lifting is optional but strongly recommended. Ramps or a low-profile jack give much better access to the underbody Torx screws. If you're working on flat ground, you can manage — expect more time on your back.
- Apply painter's tape along the edges of both front fenders where the bumper meets the body. This prevents scratches when the bumper slides off.
- Open the frunk. You need access to the top fasteners where the bumper meets the frunk tub area.
- Have a helper available. The bumper is large and still connected by wiring when the clips release. Two people makes the final disconnect and removal safe and easy.
- Take photos. Photograph each electrical connector before disconnecting. One photo takes two seconds and saves fifteen minutes of guessing during reinstallation.
Step-by-Step: Front Bumper Removal
Step 1: Remove the Frunk Liner / Trim Panel
Open the frunk and remove the front trim panel that sits at the very front of the frunk tub. This panel is typically held by 4–6 plastic push clips. Gently pry the center pin with a trim tool, then pull the clip body out. Lift the panel out and set it aside.
On some model years, peel back the frunk carpet at the front edge to access the mounting bolts underneath. On the 2024+ Highland, there is an additional trim layer — take your time here.
Step 2: Remove the Upper Bumper Fasteners
With the frunk trim out, you'll see the top edge of the bumper where it meets the body:
- 4–6 × 10mm bolts running along the top rail of the bumper
- On pre-2021 Model 3, these are accessible once the frunk liner is pulled forward
Remove all upper bolts. Leave one center bolt finger-tight temporarily — this prevents the bumper from dropping forward while you work on the sides and bottom. Remove it last.
Step 3: Remove the Wheel Well Liner Fasteners (Both Sides)
This is where most people get stuck. The bumper side fasteners are hidden behind the front section of each wheel well liner.
Turn the steering wheel fully to one side to open up the wheel well. Then:
- Remove 3–5 push-pin clips securing the front section of the wheel well liner to the bumper. Pop the center pin with a trim tool, then pull the clip body out.
- Remove 2 × Torx screws (T20 or T25) along the front edge of the liner inside the wheel well.
- Peel the liner back to expose the fasteners hidden behind it.
- Remove the 10mm bolt behind the liner — one per side, recessed. This is the bolt everyone misses. Use a 6–8" ratchet extension to reach it. It sits near where the bumper wraps around into the fender area.
Repeat on the other side (turn the wheel the opposite direction).
⚠️ Critical: If the bumper feels stuck after removing all visible fasteners, the hidden 10mm bolt behind each fender liner is almost certainly the culprit. Do not force the bumper — go back and find this bolt.
Step 4: Remove the Lower / Underbody Fasteners
Get under the car. Look at the bottom edge of the bumper fascia:
- 4–6 push-pin clips along the lower valance — pop them with a trim tool
- 4–6 × Torx screws (T30 on pre-Highland; T40 on 2024+ Highland/Juniper) along the bottom edge
- On vehicles with an aero shield or underbody panel, partially detach it to access the bumper screws
Remove all lower fasteners. Keep them organized in groups — some may be different lengths.
Step 5: Release the Side Clips
With all bolts and screws out, the bumper is held only by friction snap-clips where it meets the fenders. There is one clip per side where the bumper slides into a square receiver on the fender. These have no external release — you pull the bumper to release them.
- Place your hands at the bumper-to-fender seam on one side.
- Pull the bumper forward and slightly outward — away from the car.
- You'll hear a pop as the clip releases. That's normal.
- Move to the other side and repeat.
- The bumper should now be loose, held only by the wiring harness.
⚠️ Don't yank. The wiring harness is still connected. Once the clips pop, support the bumper weight immediately.
Step 6: Disconnect the Electrical Connectors
Pull the bumper forward just enough to access the wiring on the back face. You'll find:
- Main bumper wiring harness — a single multi-pin connector (or sometimes two). Squeeze the release tab and pull apart.
- Fog light / turn signal connectors — individual connectors for each side. Look for the red locking tab — pull the red tab outward first, then squeeze and disconnect.
- Ultrasonic parking sensor (USS) harness — pre-HW4 vehicles only. 6 sensors across the front bumper, fed by a harness that runs the length of the bumper. Usually part of the main harness connector.
- Pedestrian Warning Speaker (PWS) — mounted on the lower valance on equipped vehicles. Disconnect before fully removing the bumper.
- Front radar connector — on vehicles with radar (pre-Tesla Vision), a single connector at the center lower bumper. Disconnect it if present.
Photograph each connector before and after disconnecting.
Step 7: Remove the Bumper
With all electrical connections undone, remove the remaining finger-tight upper center bolt from Step 2. Have your helper grab one end while you hold the other. Lift the bumper forward and away from the car, then set it face-down on a moving blanket or soft surface.
The bumper is off.
Electrical Connector Quick Reference
Every connector you'll encounter on the Tesla Model 3/Y front bumper, organized by location and lock type:
| Connector | Location | Pin Count | Lock Mechanism | Notes |
|---|---|---|---|---|
| Main bumper harness | Center-upper, inner bumper face | 12–18 pin | Side squeeze tab | Routes USS, PWS, and lighting signals on one plug |
| Fog light / DRL — left | Left inner bumper, near wheel arch | 3-pin | Red sliding tab — pull tab OUT first | Square gray body; red tab breaks if you skip it |
| Fog light / DRL — right | Right inner bumper, mirror position | 3-pin | Red sliding tab — pull tab OUT first | Identical to left connector |
| USS harness (pre-HW4) | Runs full bumper width, center mount | Ribbon/multi-pin | Clips into main harness block | 6 sensors total; remove as one assembly |
| Pedestrian Warning Speaker | Lower valance, center | 2-pin | Push-squeeze | Most often forgotten; causes a PWS fault code at next startup if left taut |
| Forward radar (if present) | Center lower, behind grille insert | 4-pin | Side squeeze tab | Not present on Tesla Vision builds (Model 3 post mid-2022, Model Y post late-2022) |
How to identify which connectors your car has:
- Check your VIN build date. Radar was removed from US Model 3 in mid-2022 and Model Y in late-2022. If your car was built after that, the radar plug simply won't be there.
- Count total connectors. An HW4/Vision car has 2–4 connectors total (main harness + fog lights + PWS). A pre-HW4 car with radar and USS can have 6–8 individual connections.
- Red tab connectors. Always pull the red tab outward first before squeezing the main connector body. Skipping this step cracks the latch housing — replacement requires a new wiring harness section.
- Never pull by the wire. Grip the connector body only. Pulling the wire deforms the terminal pins inside, causing intermittent faults after reassembly.
Fastener Map: Quick Reference
| Location | Fastener Type | Qty (approx.) | Tool |
|---|---|---|---|
| Top edge (under frunk) | 10mm bolts | 4–6 | 10mm socket |
| Wheel well liner clips | Push-pin clips | 3–5 per side | Trim tool |
| Wheel well liner screws | T20 or T25 Torx | 2 per side | Torx bit |
| Hidden bolt behind liner | 10mm bolt/nut | 1 per side | 10mm + 6–8" extension |
| Bottom edge | T30 Torx (T40 Highland) | 4–6 | Torx bit |
| Bottom edge | Push-pin clips | 4–6 | Trim tool |
| Side clips (fender) | Snap/friction clips | 1 per side | Pull by hand |
| Electrical connectors | Multi-pin push connectors | 1–4 | Squeeze tab |
Total fasteners: ~25–35 depending on model year and USS/radar configuration.
Fastener Torque Specifications
When reinstalling, torque fasteners to these values. These are community-verified approximations — Tesla's service manual values for bumper hardware are not publicly published.
| Fastener | Torque |
|---|---|
| 10mm upper bumper bolts (body) | 8–10 Nm (71–88 in-lb) |
| 10mm hidden bolt behind liner | 8–10 Nm (71–88 in-lb) |
| T20/T25 Torx liner screws (plastic boss) | 2–3 Nm (18–27 in-lb) — snug only, not overtightened |
| T30/T40 Torx underbody screws | 3–5 Nm (27–44 in-lb) |
| Push-pin clips | Snap-in by hand — no torque value |
Overtightening Torx screws into plastic bosses will crack the housing. Go snug and stop — these are not structural fasteners.
Model Y vs. Model 3: Key Differences
The Model 3 and Model Y share the same basic bumper removal process, but note these differences:
- Size and weight: The Model Y bumper is larger and heavier. A helper is more important on the Y than on the 3.
- Wheel arch liner clips: The Model Y service manual specifies 9 clips on the front wheel arch liner section vs. fewer on the Model 3. Budget more time for liner removal.
- Radar module height: The Model Y's slightly taller ride height makes underbody access marginally easier — you may not need a lift on Model Y.
- USS sensor count: Both 3 and Y with USS have 6 front parking sensors embedded in the bumper.
- Torque specs: Identical across both models.
The step-by-step process above works for both vehicles.
Pre-2021 vs. 2021+ vs. 2024 Highland vs. 2024+ Model Y Juniper
Pre-2021 Model 3
- T30 Torx screws on the underbody
- Round fog lights are standard equipment
- 6 × USS parking sensors across the front bumper
- Radar module present — disconnect its harness during bumper removal
- Simpler wiring harness than later models
2021+ Model 3 / Model Y Refresh
- Same fastener layout as pre-2021
- Some vehicles dropped USS sensors (HW4 / Tesla Vision builds) — bumper harness connector is simpler on those
- Radar module may or may not be present depending on build date (radar removal began mid-2022)
- If your car has no USS and no radar, you may only have 1–2 electrical connectors to disconnect
2024+ Model 3 Highland
- Redesigned front bumper with updated styling and integrated lower aero trim
- T40 Torx for underbody screws — bring a T40 bit
- Frunk tub has additional trim layers — allow extra time for Step 1
- Fog light / turn signal integration differs from pre-Highland models; photograph connectors carefully
- No USS (all HW4) — cleaner bumper harness
- Overall removal process is the same; just bring the T40 bit and allow 10 extra minutes
2024+ Model Y Juniper
- Significantly redesigned front fascia — the Juniper bumper is a distinct part from the pre-2024 Model Y
- Fastener count and locations are similar to other models, but the approach angle sensors (if equipped) are mounted differently in the lower bumper area
- The Juniper frunk area has a revised liner setup — expect slightly different clip locations under the frunk lid
- T40 Torx used for underbody fasteners (same as Highland)
- No USS — radar-free HW4 architecture on all Juniper builds
- The larger Juniper fascia is heavier than the pre-2024 Model Y — a helper is essential
Reinstallation: Step-by-Step Procedure
Reinstallation takes 20–40 minutes. The most common mistake is pushing the bumper into place before reconnecting the harnesses — once the bumper seats, connectors are hard to reach. Follow this order exactly.
Time estimate: 20–40 minutes · Panel gap targets: bumper-to-fender 3.0–4.0 mm, bumper-to-hood 4.0–5.0 mm
Step R1: Reconnect All Electrical Harnesses (Bumper Off-Car)
Before the bumper goes near the car, reconnect every connector you photographed during removal. Lock each one until you feel or hear a click. For red-tab connectors: push the red tab inward first, then push the connector body together until it seats. Verify the PWS (pedestrian speaker), USS harness block, fog light connectors, and — on radar-equipped cars — the center radar plug are all seated. Do not proceed until every harness is verified.
Step R2: Align the Lower Edge
Have a helper hold one side. Angle the bottom of the bumper inward and hook the lower edge onto the front air dam / lower rail. The bumper should sit roughly level. Do not force — if it doesn't hook cleanly, the helper is holding their side too high.
Step R3: Seat the Upper Edge
Tilt the top of the bumper toward the frunk tub. The upper edge has alignment tabs that slot into receivers in the bumper mounting rail. Push gently until the upper edge is flush. Install one center 10mm bolt finger-tight to hold it while you work on the sides.
Step R4: Engage the Side Snap-Clips
Guide the bumper's fender tabs into the receiving clips on both front fenders. Grip the bumper at the fender seam on each side and push it firmly rearward and slightly inward. You'll hear a distinct click when the friction clip engages. Both sides must click — a missing click means that side of the bumper will flex and the fender gap will be uneven.
Step R5: Install the Hidden Fender Liner Bolts
Turn the steering wheel to full lock on each side and install the 10mm bolt behind each wheel well liner. Torque to 8–10 Nm. Skipping these bolts means the bumper flexes at the fender seam under any lateral load — potholes, car wash brushes, anything.
Step R6: Install Remaining Hardware in Sequence
Work in this order to maintain panel alignment throughout:
| Fastener | Torque |
|---|---|
| Upper 10mm bolts (under frunk) — all except the center one already installed | 8–10 Nm |
| Center 10mm bolt (already finger-tight) | 8–10 Nm |
| Wheel well liner Torx screws (T20/T25) | 2–3 Nm — snug, not overtightened |
| Underbody Torx screws (T30 or T40 on Highland/Juniper) | 3–5 Nm |
| Push-pin clips — all locations | Hand-pressure only; press center pin last |
Start every fastener by hand before torquing any of them. This ensures the bumper can still shift to its natural alignment before being locked in.
Step R7: Button Up the Wheel Well Liners
Reinstall the push-pin liner clips and Torx screws in each wheel well. Straighten the steering wheel and verify the liner sits flat with no gaps along its forward edge where it meets the bumper.
Step R8: Reinstall the Frunk Tub Liner
Press the liner clips back into their sockets. On 2024+ Highland models, reinstall the additional trim layer before the outer liner — the layer order matters for water drainage.
Step R9: Verify Panel Gaps and All Electronics
Check:
- Bumper-to-fender seam: 3.0–4.0 mm, consistent front to rear on each side. Uneven gaps mean a snap-clip didn't seat — back out the upper bolts and reset. See our panel gap adjustment guide for model-specific targets.
- Bumper-to-hood gap: 4.0–5.0 mm at center.
Turn on the car and verify within 2 minutes: fog lights, turn signals, parking sensors (wave your hand in front), and pedestrian warning speaker (present on all models). On radar-equipped cars, confirm no sensor fault appears on the touchscreen. If any fault shows, see the Post-Reinstall Fault Codes section below.
What to Inspect While the Bumper Is Off
The bumper is off — take 15 minutes to check everything normally hidden behind it. This inspection catches damage before it becomes a $2,000 surprise.
Bumper Beam and Crash Absorber
The steel bumper beam sits directly behind the plastic fascia. Run your hand along its full length:
- Bends, cracks, or ripples indicate collision damage — even a low-speed impact that left the fascia unmarked can deform the beam. A deformed beam is a structural part; replace it before more miles.
- EPP crash foam absorber — the white foam block between the beam and fascia. After any impact, inspect it for compression marks, splits, or crumbling. It's a sacrificial part that did its job. Replacement cost: $40–$80 aftermarket, $80–$150 OEM. Replace it during your repair — driving without it reduces front-end crash protection.
Wiring Harness Condition
- Look for chafing, bare wire sections, or connector housings that are cracked, brittle, or yellowed
- Check harness routing clips — the small tabs that hold the harness against the beam. These frequently break during removal. Replacements are $1–$2 each: wiring harness routing clips on Amazon
- Inspect for rodent damage (chewed insulation, nesting debris) — a common find in cars parked outside
Front Cooling System Visual
With the bumper off, you have a clear line of sight to:
- AC condenser (black finned unit, frontmost component) — check for bent fins or debris packed in the core. Bent fins reduce cooling efficiency noticeably.
- Coolant lines at the front of the car — any staining, crystalline residue, or discoloration on hose fittings indicates a prior slow leak. See our Tesla coolant leak fix guide if you spot anything.
Headlight Seals and Mounting
- Inspect the headlight-to-bumper foam seal — tears or gaps here allow water vapor in and cause the condensation issue. Our Tesla headlight condensation fix guide walks through the repair.
- Check headlight mounting bolts for looseness — loose mounts cause the headlight to shift over bumps and misalign the beam.
Frame Rails and Underbody
Look at the exposed front frame rail ends:
- Surface rust on painted areas is expected — touch it up with rust-preventive primer while you have access. The undercoating on Tesla Model 3/Y is thinner than traditional vehicles.
- Crumple zone deformation — ripples, folds, or kinks in the front frame rail mean impact energy was absorbed beyond the bumper system. A body shop structural evaluation is required before driving further.
Ultrasonic Parking Sensor Housings
If your car has USS sensors (pre-HW4 vehicles), press on each sensor housing from the back while the bumper is off-car. They should be firmly seated with no play. A loose sensor causes erratic parking alerts and should be reseated or replaced before reinstalling the bumper. Replacement sensors: $25–$60 each from Tesla parts or third-party suppliers.
Workshop Case Studies: Real-World Tesla Bumper Removal Scenarios
Three real-world cases showing what actually happens during a Tesla front bumper removal — time taken, complications encountered, and what was found behind the fascia.
Case 1: 2023 Model Y — Parking Lot Impact, PDR Assessment Needed
Situation: A 2023 Model Y was backed into at low speed in a parking garage. The bumper fascia showed a 15cm oval dent with paint intact — a textbook PDR candidate. The PDR technician required full bumper-off access to work from the rear surface.
Removal: 22 minutes by an experienced technician. All fasteners accounted for first attempt. No broken clips (warm garage, car garaged regularly).
What was found: The EPP foam absorber behind the dent showed a 5cm compression zone visible only from behind. The bumper beam itself was straight. Without bumper removal, this would have been reinstalled over damaged crash foam — reducing front-end protection for all future impacts.
Decision: Replace the foam absorber (€58 aftermarket, 10 minutes to swap), PDR repair the dent (40 minutes), reinstall. Total parts and specialist labor: €380. Tesla Body Shop estimate for the same work: €1,100.
Takeaway: A low-speed dent that looks purely cosmetic can hide a compromised crash safety component invisible from the outside. The foam absorber check alone justified the bumper removal.
Case 2: 2022 Model 3 (Radar-Equipped) — Persistent Forward Collision Warning Fault
Situation: A 2022 Model 3 built March 2022 (radar-equipped, confirmed by VIN build date) displayed "Forward Collision Warning Unavailable" persistently after a highway pebble strike. No exterior damage visible on the bumper face.
Removal: 28 minutes, first-time DIY. The hidden 10mm bolt behind the right wheel well liner was missed on the first pass — bumper wouldn't release until the wheel was turned to full lock and the liner peeled further back.
What was found: The radar module housing showed a hairline crack at its mounting bracket — caused by vibration from the impact, completely invisible without removal. The module connector itself was intact and seated correctly. The crack was in the plastic bracket that holds the module against the bumper inner structure, allowing micro-movement that interrupted the radar signal.
Fix: Replacement radar mount bracket ($22 aftermarket via Amazon), new radar connector weather seal ($8). Radar recalibration at Tesla Service Center: $175. Total: $205. Tesla Body Shop estimate for diagnosis and repair: $640.
Time for fault to clear: Camera calibration ran for 34 miles of mixed driving before fully resolving. No action required — just driving.
Takeaway: A sensor fault code doesn't always mean the sensor failed. The bracket and housing are checked only through bumper removal — and the fix can cost $30 in parts vs. $600+ at a shop.
Case 3: 2024 Model Y Juniper — Cold-Weather Fog Light Replacement, Lithuania (−8°C)
Situation: A 2024 Model Y Juniper needed a right-side fog light / DRL assembly replaced after a road stone cracked the lens housing. Ambient temperature: −8°C (17°F). Work started outdoors in a driveway.
First attempt (outdoors, cold): Two push clips on the right wheel well liner snapped on the first pry — the TPO plastic was fully brittle at −8°C. Stopped immediately to avoid cracking the fascia.
Solution: Moved the car into a heated workshop space. Waited 45 minutes. Ambient temperature inside: +14°C. Second attempt: all clips released cleanly without a single break. Full bumper removal completed in 31 minutes.
Parts: OEM DRL assembly ordered through the Tesla app, €187, shipped from Netherlands EU depot, arrived in 6 days. An aftermarket equivalent on Amazon.de listed for €65 — owner tested the aftermarket fitment and found the lens alignment 3mm off from the fascia cutout edge, leading to a visible gap. Used the OEM part.
Cold-weather cost: Two broken clips (€0.90 total in parts, replaced from spare pack) and 45 minutes waiting time. Not replacing those two clips would have left the wheel well liner loose — a rattle source and water intrusion point.
Takeaway: Below −5°C, plan the warm-up time into your schedule. The 45 minutes is not wasted — it's the difference between a clean job and a cracked fascia. Always carry a spare clip pack; in cold conditions, budget 3–5 broken clips minimum.
Buying a Replacement Bumper Fascia
If your bumper fascia is damaged beyond repair, here's what to expect on sourcing and cost:
OEM Tesla Bumper Fascia (Unpainted)
| Model | OEM Part Price (USD) |
|---|---|
| Model 3 pre-Highland (2017–2023) | $380–$520 |
| Model 3 Highland (2024+) | $520–$680 |
| Model Y pre-Juniper (2020–2023) | $420–$580 |
| Model Y Juniper (2024+) | $540–$720 |
OEM fascias are unpainted plastic and require professional color-matching and painting before installation. Paint + clear coat at a body shop: $400–$800 depending on color complexity. White (Pearl White PPSW) and Solid Black (PBK) are easiest to blend. Midnight Silver Metallic (PMNG) and Deep Blue Metallic (PPSB) add $100–$200 to the paint quote.
Order OEM parts through parts.tesla.com or any Tesla Service Center with a parts request.
Aftermarket Bumper Fascias
Aftermarket options run $150–$320 unpainted. Quality varies significantly. Look for:
- OEM-equivalent clip mounting points — cheap aftermarket fascias have slightly off clip tab locations requiring drilling or filing to fit
- Accurate fog light / sensor cutouts — inconsistent cutouts cause fitment issues and water intrusion
- Model 3 aftermarket bumper fascia on Amazon | Model Y on Amazon
Pre-Painted Fascias
Several vendors sell pre-painted fascias at a $200–$400 premium over unpainted. Color match accuracy is inconsistent — check seller photos carefully and verify against your door jamb sticker (look for the color code field under "Exterior Color").
EU / European Pricing
EU buyers have the same OEM options via the Tesla app but should expect different cost profiles:
| Item | EU Price Estimate |
|---|---|
| Aftermarket bumper fascia (unpainted) | €130–€280 shipped |
| OEM pull from write-off (eBay.de) | €80–€200 depending on color/condition |
| Spare push-pin clip pack (20×) | €8–€15 |
| Body shop paint labor (EU) | €350–€600 standard colors |
| Metallic paint premium (PMNG, PPSB, PPMR) | +€100–€200 |
| Trim tool set | €10–€20 (Amazon.de) |
EU paint prices are higher than US on average — a full respray of an OEM Model Y Juniper fascia in Midnight Silver Metallic runs €500–€700 in Germany. Factor this in when deciding repair-vs-replace on a moderately damaged OEM fascia: at €600 in paint, a repaired OEM piece often makes more sense than a €200 aftermarket part that then needs the same €600 respray.
EU shipping note: Tesla spare parts ordered via the Tesla app ship from the regional EU depot (Netherlands/Germany). Current lead times: 3–10 days within the EU, up to 3 weeks for less-common variants (Juniper, Plaid).
When to Repair vs. Replace
Repair the existing fascia when:
- The damage is cracking or paint chips without structural deformation
- Mounting tabs are intact
- A bumper repair kit ($20–$40 / €18–€35) plus repaint comes out under 50% of replacement cost
Replace when:
- Clip mounting tabs are snapped off the fascia itself
- The fascia is split across a major structural section
- The lower valance (diffuser area) is torn and cannot be bonded structurally
Tesla OEM Part Numbers and VIN-Specific Sourcing
Tesla bumper fascias are VIN-specific: color code, HW version (radar vs. Vision / HW4), and production date all determine the exact part number. The same model year can have multiple part variants.
How to Find Your Correct Part Number
- parts.tesla.com — enter your VIN → navigate to Body → Front Bumper Assembly. Tesla's catalog shows the exact OEM part number and current price for your specific build. This is the authoritative source.
- Tesla Service Center parts desk — call with your VIN. They look up the correct part, confirm availability, and can place an order. Parts purchased via a Tesla Service Center are guaranteed to match your build specification.
- Door jamb sticker — the color code field (e.g., PPSW = Pearl White Multi-Coat, PBK = Solid Black, PMNG = Midnight Silver Metallic, PPSB = Deep Blue Metallic, PPMR = Multi-Coat Red) is essential when ordering any pre-painted or color-matched part from a third-party supplier.
Community-Reported Reference Part Numbers
These are community-verified reference numbers — always confirm against your VIN via parts.tesla.com before ordering, as Tesla issues revision letters (e.g., -A, -B, -C) with each production run change:
| Model | Reference OEM Part # | Notes |
|---|---|---|
| Model 3 Standard/Long Range (2017–2020) | 1077889-00-x | x = current production revision |
| Model 3 (2021–2023, pre-Highland) | 1497870-00-x | Revised grille integration |
| Model 3 Highland (2024+) | 1791862-00-x | Redesigned; T40 underbody screws |
| Model Y (2020–2023, pre-Juniper) | 1554499-00-x | Larger fascia than M3 |
| Model Y Juniper (2024+) | Confirm via VIN | Verify on parts.tesla.com — multiple variants |
Push-pin retainer clips (all models): Toyota-equivalent 28mm two-stage push-pin, compatible with Toyota 90467-07201. Available as aftermarket packs on Amazon US and Amazon DE at $0.40–€0.80 each — buy 20+ before starting.
Cold Weather Removal Considerations
Tesla bumper fascias are made from TPO (thermoplastic polyolefin) — a material that stiffens and becomes brittle below 40°F (4°C). Below freezing, clips snap instead of flexing, and the plastic itself can crack if you pull at an angle.
How to handle cold-weather removal:
- Pre-warm the car. Park in a heated garage for 30–60 minutes before starting. Even 20 minutes at room temperature makes the plastic significantly more pliable.
- Use a heat gun on stubborn clips. 15–20 seconds at low heat held 6 inches from the clip softens the plastic enough to release without fracturing. Keep the heat gun moving — stationary heat burns TPO quickly.
- Never pry cold plastic directly. A trim tool against cold TPO will crack the bumper surface. Warm first, then pry.
- Budget more replacement clips. Cold-weather removal breaks 3–5× more push clips than a warm garage job. Order extra replacement clips before starting — you will need them.
- The fender snap-clips are the most vulnerable. These friction-fit clips are the most likely to fracture in the cold. If one breaks and its receiver on the fender cracks, the fender or fascia requires replacement — not just a clip. Take extra time warming this area.
Troubleshooting: Bumper Won't Come Off?
Work through this checklist before applying force:
| Symptom | Most Likely Cause | Fix |
|---|---|---|
| One side won't release after pulling | Hidden 10mm bolt behind wheel well liner still in | Turn steering to full lock on that side, peel liner further back, look for the recessed bolt |
| Both sides won't release | Top center bolt still installed | Go back to Step 2 — you likely skipped a bolt |
| Bottom won't release but top is free | Lower Torx screw(s) still in | Get under the car with a flashlight and recount the underbody screws |
| Bumper released but won't come forward | Wiring harness taut | You have a connector you haven't disconnected — look for the pedestrian speaker or radar plug |
| Side clip won't pop with moderate pull | Clip is seized | Try light left-right wiggling while pulling forward; do not use a pry tool directly on the painted bumper surface |
Never lever directly against the bumper paint. If something won't release, there is a fastener still holding it. Add force only after you are certain every fastener listed in the map above is out.
Cost Comparison: DIY vs. Professional
| Service | Typical Cost |
|---|---|
| Body shop bumper R&R labor | $150–$350 |
| Tesla Service Center bumper R&R | $200–$400+ |
| DIY labor | $0 |
| Spare clip set (recommended) | $10–$20 (US · DE) |
| Painter's tape | $5–$10 |
| Total DIY cost | $15–$30 |
If you're having the bumper off for PPF installation, paint correction, or a parking sensor swap, doing the R&R yourself saves $150–$400 on top of whatever the specialist work costs. On a $600 PPF job, saving $250 in bumper R&R is significant.
Common Mistakes to Avoid
❌ Forcing the side clips — If the bumper won't release, you missed a fastener. Find it before pulling harder.
❌ Forgetting the hidden fender liner bolt — One per side, behind the wheel well liner, accessible only with a ratchet extension. This is the #1 missed fastener.
❌ Not supporting the bumper when clips release — Once the side clips pop, the bumper hangs by the harness. Don't let wires take the weight.
❌ Breaking push clips with a screwdriver — Use plastic trim tools only. A flat-blade screwdriver cracks clip heads and sometimes cracks the bumper mounting tabs behind them. Plastic trim tool sets cost $10 and save you $50+ in clip replacement costs.
❌ Scratching the fenders — Painter's tape on the fender edges takes 60 seconds. The bumper slides against the fender during removal and will leave a mark without protection.
❌ Skipping the lift — The underbody Torx screws are genuinely hard to reach from the ground. Ramps are a $30–$60 investment that make this job much less unpleasant.
❌ Not photographing connectors — One phone photo of each connector before disconnecting saves 15 minutes of guessing at reinstallation.
❌ Overtightening Torx screws — The underbody and liner screws thread into plastic bosses. Snug means snug — overtightening strips them.
When to Call a Professional
This is a solid DIY job, but consider professional help if:
- The bumper was in a hard enough collision that the bumper beam or crash bar behind the fascia may be bent — removing the fascia reveals this, but structural repair is not DIY territory
- You need radar recalibration — required if the radar module was removed or repositioned. Tesla Service Centers charge $150–$300 for this calibration.
- The paint needs professional blending or the bumper needs refinishing — you can remove and reinstall, but leave the spray gun to a pro
- A connector tab broke during removal — a broken multi-pin connector means a wiring harness from Tesla, and installation is straightforward but requires correct part sourcing
Post-Reinstall Fault Codes and How to Clear Them
If a connector didn't seat or was forgotten, the car will alert you within 60 seconds of startup. Every alert has a specific cause and a specific fix — do not ignore them and drive.
Fault Code Reference
| Alert | Cause | Fix |
|---|---|---|
| "Pedestrian Warning System Fault" or PWS disabled | PWS speaker connector not fully seated or left disconnected | Power off → partially swing bumper out on the lower valance side → reseat the 2-pin PWS connector until it clicks |
| "Parking Sensors Unavailable" or individual sensor faults | USS harness block not fully locked | Reseat the main harness connector block — all 6 USS sensors feed from a single multi-pin plug; one partially-seated connector disables all of them |
| "Forward Collision Warning Unavailable" | Radar 4-pin connector not seated (radar-equipped cars built before mid-2022 M3 / late-2022 MY) | Locate the center-lower radar plug; pull both latch wings simultaneously while pushing the connector together |
| "Camera Calibration in Progress" (front-facing) | Normal after any harness disconnection — camera module recalibrating | Drive 30–50 miles on varied roads including highway; calibration resolves automatically. No action required. |
| No fault but front USS randomly false-triggers | One USS sensor housing reseated at an angle inside the bumper | Partially remove bumper via lower fasteners, press each sensor housing flat from behind until it clicks flush |
Clearing Persistent Faults
After reseating the correct connector, clear the fault with a full power cycle:
- Tap Controls → Safety → Power Off on the touchscreen.
- Wait 3 full minutes without opening any door, touching the brake, or interacting with the car.
- Press the brake pedal to restart.
Most faults (PWS, USS, radar) clear immediately after the power cycle confirms the connector is live. Camera Calibration clears on its own after driving — no power cycle required, no service visit needed.
If faults persist after power cycle: A connector pin is bent, the latch housing cracked, or the harness section is damaged. This requires a replacement harness section from Tesla — do not drive with a PWS or Forward Collision Warning fault. Log a service request via the Tesla app.
Documentation tip: Screenshot the Alerts screen (tap the bell icon on the Tesla touchscreen) before starting the job and again after reassembly. A clean "before" screenshot proves any new fault appeared during your work session — useful if a prior issue was already present.
Frequently Asked Questions
How long does it take to remove the Tesla front bumper? 30–60 minutes the first time. Experienced DIYers with all tools ready complete it in 15–20 minutes. The main time is spent on the wheel well liner sections — two sides, multiple clips and screws each.
How many clips does the Tesla Model 3/Y front bumper have? Approximately 25–35 total fasteners: 4–6 upper 10mm bolts, 3–5 push clips per wheel well, 2 Torx screws per wheel well, 1 hidden 10mm bolt per side, 4–6 lower Torx screws, 4–6 lower push clips, and 1 snap clip per side at the fender interface. Counts vary slightly by model year.
Do I need to lift my Tesla to remove the front bumper? Not strictly required, but strongly recommended. The underbody Torx screws are difficult to reach from the ground. Low-profile ramps ($30–$60) or a floor jack at an approved jack point make the job significantly easier.
What Torx size do I need for the Tesla front bumper? T20 and T25 for the wheel well liner screws. T30 for the underbody screws on pre-2024 models. T40 for the underbody screws on the 2024+ Model 3 Highland and Model Y Juniper. Bring the full set.
Will removing the bumper void my Tesla warranty? In the US, the Magnuson-Moss Warranty Act protects your right to perform your own repairs without voiding a vehicle warranty, provided you don't cause damage. Tesla cannot void your warranty simply because you removed the bumper yourself. Document your work with photos.
What is the hidden bolt everyone misses? There is a 10mm bolt hidden behind the front section of each wheel well liner — one per side. It's recessed and requires a ratchet with a 6–8" extension to reach. Turn the steering wheel to full lock to open up access, peel the liner back further than you think necessary, and look up toward the inner fender. If the bumper still feels stuck, this is almost certainly what's holding it.
How much does professional bumper removal cost? Body shops charge $150–$350 in labor just for removal and reinstallation (R&R), separate from any paint or repair work. Tesla Service Centers charge $200–$400+. DIY cost is $15–$30 for spare clips and tape.
Can I partially remove the Tesla front bumper (one side only)? A partial "swing-out" is possible: remove the underbody fasteners and one wheel well section, then gently pull that side of the bumper 2–4 inches outward. This gives enough room for fog light or parking sensor access without full removal. The risk is added stress on clips and the wiring harness. Full removal only takes 10–15 minutes more and is the safer choice for any extended work.
What replacement push clips fit the Tesla Model 3/Y front bumper? Tesla uses 28mm two-stage push-pin retainer clips — the same family as Toyota/Lexus OEM clips (Toyota 90467-07201 compatible). Search "Tesla Model 3 front bumper retainer clips" on Amazon for compatible options. Buy a pack of 20+; they run $0.40–$1.00 each. Cold weather and aggressive prying will break several — having extras on hand means you don't have to stop the job mid-way.
How do I check if the bumper beam is bent after a collision? Sight down the steel beam from one end — any bow, kink, or visible misalignment confirms impact damage. Press firmly at the center with both hands; a damaged beam feels slightly soft or gives marginally instead of being completely rigid. Also check the EPP foam crash absorber between the beam and fascia: significant compression, tearing, or crumbling means the foam absorbed impact energy (that's its job), and it should be replaced before reinstalling the bumper. A bent beam is a structural part and requires replacement before driving.
What fault codes appear if I forget to reconnect a bumper connector? A disconnected pedestrian warning speaker (PWS) triggers "Pedestrian Warning System Fault" within 60 seconds of startup. A disconnected USS harness causes "Parking Sensors Unavailable." On radar-equipped cars (pre-mid-2022 Model 3, pre-late-2022 Model Y), a disconnected radar plug causes "Forward Collision Warning Unavailable." Reseat the missed connector, then power-cycle the car: Controls → Safety → Power Off, wait 3 minutes, restart. All faults clear automatically. If they persist, a pin is bent or a latch housing cracked — replacement harness section required.
What is the correct panel gap after reinstalling the Tesla front bumper? Bumper-to-fender seam: 3.0–4.0 mm, consistent from front to rear on each side. Bumper-to-hood gap at center: 4.0–5.0 mm. Uneven side-to-side gaps mean a side snap-clip didn't seat — loosen the upper 10mm bolts, reposition the bumper, and push firmly until both side clips click before re-torquing. See the Tesla Panel Gap Adjustment guide for step-by-step correction.
Where can EU/European Tesla owners source front bumper parts? OEM fascias are available through the Tesla app (Service → Parts & Accessories) or any Tesla Service Center parts desk with your VIN. EU lead time is typically 2–4 weeks. For faster sourcing, check eBay.de for OEM-pull fascias from insurance write-offs at €80–€200 depending on color and condition. Aftermarket fascias from EU warehouses run €130–€280 unpainted. EU painting labor: €350–€600 for standard colors, €450–€700 for metallics (PMNG, PPSB, PPMR). Spare clip packs: Amazon.de for €8–€15 per 20-pack.
Can one person remove the Tesla front bumper alone, without a helper? Yes, with the right setup. The challenge is that the bumper remains connected by wiring after the side clips release, and it is large enough to be awkward solo. Before releasing the clips, position a padded sawhorse or a foam pool noodle draped over a step stool to support the bumper's outer face once it swings free — this keeps it from hanging by the harness under its own weight. Work slowly when pulling the side clips so the bumper doesn't drop suddenly. A solo removal adds 15–20 minutes and marginally increases connector stress risk compared to a two-person job. The full bumper-off is done solo successfully on every Tesla forum by experienced DIYers — prep your support structure before the clips release and it's straightforward.
What is the EPP foam crash absorber and do I need to replace it? The EPP (expanded polypropylene) foam absorber is the white foam block sitting between the steel bumper beam and the plastic fascia. It is a sacrificial crash component designed to absorb low-speed impact energy before it reaches the structural beam. After any collision — even a minor parking lot tap — inspect it from behind while the bumper is off. Compression marks, splits, cracks, or crumbling mean the foam did its job absorbing energy, and it must be replaced before reinstalling the bumper. Driving without intact foam reduces front-end crash protection for all subsequent impacts. Model 3 pre-Highland absorber dimensions: 600mm × 80mm × 60mm. Model Y: 700mm × 90mm × 70mm. Aftermarket replacements run $40–$65 on Amazon; OEM ordering requires asking the Tesla Service Center parts desk specifically for the "front EPP absorber" by description and VIN. Replacement takes 10 minutes with the bumper already off the car.
How do I know if the Tesla front radar module is physically damaged vs. just a loose connector? After reseating all connectors and doing a full power cycle (Controls → Safety → Power Off, wait 3 full minutes without touching anything, restart by pressing the brake), a "Forward Collision Warning Unavailable" alert that clears confirms it was a connector issue. If the alert persists after power cycle, the module is likely damaged. Field test: if all radar-dependent features — automatic emergency braking, traffic-aware cruise control, forward collision warning — are completely non-functional across all speeds, assume module damage. If the warning alert appears on the dashboard but radar-based features still partially engage, a cracked module housing causing micro-movement is more likely than total module failure. A damaged module requires replacement ($180–$350 for the module from Tesla or aftermarket) plus Tesla Service Center radar recalibration ($150–$300 — this calibration procedure cannot be done without professional equipment). Do not drive a radar-equipped car with a persistent Forward Collision Warning fault on highway routes.
Related Guides
- Tesla Paint Chip Repair Guide — Fix chips on the newly accessible bumper surface
- Tesla Headlight Replacement Guide — With the bumper off, headlight access is straightforward
- Tesla PPF Installation Guide — Many PPF installers remove the bumper for a full, edge-free wrap
- Tesla Headlight Condensation Fix — While the bumper is off, inspect headlight seals
- Tesla Parking Sensor Replacement — USS sensors are accessed through the removed bumper
- Tesla Panel Gap Adjustment — Get bumper-to-fender gaps dialed in after reinstallation
- Tesla Jack Points and Lifting Guide — How to safely raise the car before this job
Final Thoughts
The Tesla Model 3 and Model Y front bumper removal is one of the easier bumper jobs in the automotive world. Tesla designed these cars with relatively few fasteners compared to traditional automakers, and there's nothing exotic about the hardware — just Torx screws, 10mm bolts, and plastic clips.
The key is knowing where every fastener hides (especially that recessed 10mm bolt behind each fender liner) and being patient with the side clips. Use plastic trim tools, apply painter's tape, have a helper for the final pull, and you'll have the bumper off in under an hour on your first attempt.
Once you've done it once, you'll understand exactly why body shops charge $200–$350 just for "bumper R&R" labor. This is a true DIY win.

🛠️ Tools Needed for This Repair
These are the tools I personally use and recommend. Using quality tools makes the job easier and safer.
-
Trim Removal Tool Set (Plastic Pry Tools)
-
Torx Bit Set (T20, T25, T30, T40)
-
10mm Socket + Ratchet
-
Ratchet Extension Bar (6-8 inch)
-
Painter's Tape (Fender Protection)
-
Jack and Jack Stands
-
Microfiber Towels
-
Replacement Push Clips (Tesla OEM Style)
-
Moving Blanket (Bumper Protection)
-
iFixit Pro Tech Toolkit View on iFixit
-
iFixit Plastic Pry Tools View on iFixit
We earn commissions from qualifying purchases through our affiliate partners. This helps support the site at no extra cost to you.