Tesla 12V Battery Replacement: Step-by-Step DIY Guide
The low-voltage battery in your Tesla is one of the most common components that will eventually need replacement. Despite having a massive high-voltage battery pack, every Tesla relies on a smaller auxiliary battery to power essential systems like the computer, door locks, and lights. When this battery fails, your Tesla won't start—even with a fully charged main battery.
Tesla service centers charge $250–$400+ just for this routine swap. With a $60–$150 battery and 45 minutes of your time, you can do it yourself.
Important: Tesla has used three different low-voltage battery types across model years:
| Generation | Voltage | Chemistry | Models |
|---|---|---|---|
| Pre-late 2021 | 12V | Lead-acid | Model 3, Y, S, X |
| Late 2021–2023 | 12V | Lithium-ion (NMC/LFP) | Model 3, Y (RWD/LR) |
| 2024+ (Highland/Juniper) | 16V | Lithium-ion | Model 3 Highland, Model Y Juniper |
This guide covers all 12V systems in detail and explains the 16V difference at the end. Check your manufacture date — if you're unsure which system you have, put a multimeter across the battery terminals: 12V = 12–13.5V resting, 16V system = 15–16.8V resting.
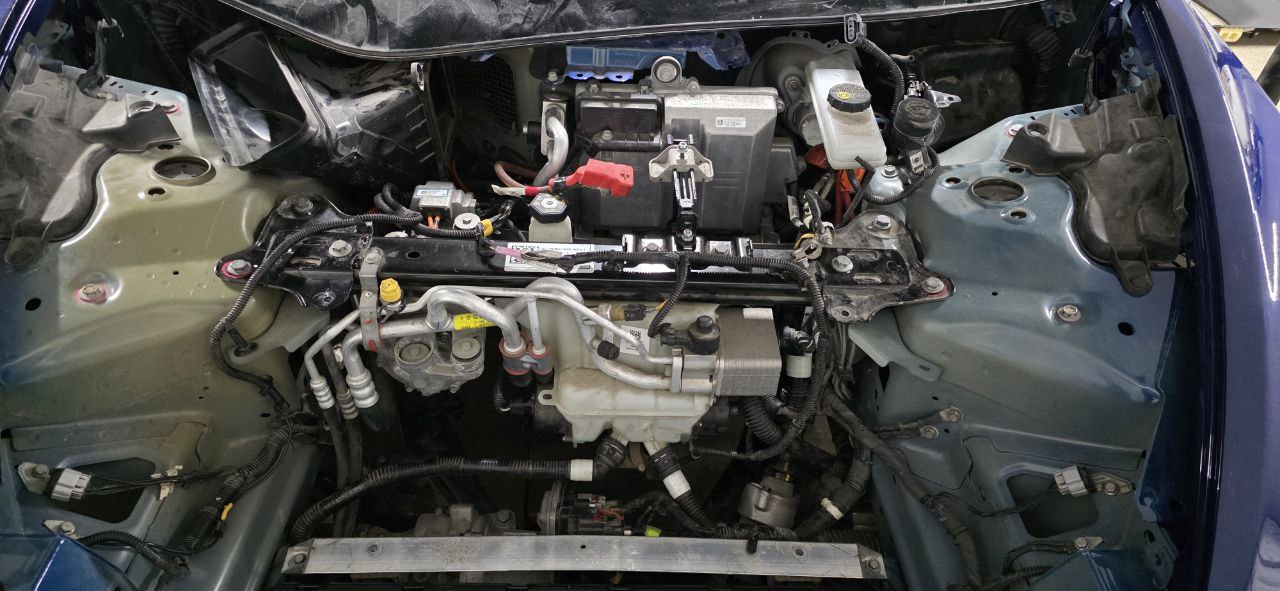 2018 Model 3 frunk with covers removed, exposing the thermal management system, brake fluid reservoir, and A/C compressor. The 12V battery sits under a cover on the right side.
Signs Your Tesla 12V Battery Needs Replacement
Before diving into the replacement process, here's how to know if your 12V battery is failing:
- "12V Battery Low" warning on your touchscreen (if your screen went black before the warning, the battery may already be dead)
- Car won't wake up or respond to the app
- Doors won't open with the key card or phone key
- Random system reboots while driving
- Clicking sound when trying to start
- The car loses settings overnight
Emergency: Tesla Won't Open — Jump the 12V Terminals First
If the battery has already died and you're locked out, you need to power the car externally before you can even access the frunk. This is different from a gas car jump-start — you're not cranking an engine, you're supplying just enough voltage for the computers to wake up and release the latches.
Model 3 and Model Y: Jump via Tow Hook Cover
- Find the tow hook cover on the front bumper (driver's side, lower left on Model 3 / center-lower on Model Y)
- Pry off the cover with a flat tool or your fingernail — it pops out with firm pressure
- Behind it you'll see two terminals: red (+) and black (−)
- Connect a 12V battery booster or a second car with jumper cables — positive to red, negative to black
- Wait 30 seconds for systems to initialize
- Try the door handles — they should present normally now
- Open the frunk and replace the battery before removing the external power source
Booster recommendation: A compact lithium jump starter like the NOCO Boost Plus (US) is ideal to keep in the frunk. It's small enough to store there and can power the car enough to open the frunk and replace the battery.
Model S: Emergency Frunk Release
On pre-2021 Model S, there's no external jump terminal. You need to:
- Access the front trunk emergency release — pull the manual cord behind the passenger-side headlight assembly (requires removing the headlight partially)
- Alternatively, use the hidden jumper terminals in the wheel well on some S variants — consult your year-specific service manual
For a full walkthrough of getting into a completely dead Tesla, see our Tesla Won't Start or Turn On guide and the Emergency Door Release guide.
What NOT to Do
- Do not connect jumper cables to the high-voltage orange cables — those carry 400V and will kill you
- Do not use a 24V truck charger — even briefly, 24V can damage the 12V system
- Do not leave the external power source connected while driving away — disconnect once the frunk is open and you're working on the replacement
What You'll Need
For this job, you'll need basic tools and about 30-60 minutes. Tesla service centers charge $200-400+ for this repair, but you can do it yourself for around $80-150 depending on the battery you choose.
Battery Options (for 12V systems only):
Lead-acid vehicles (pre-late 2021):
- OEM Lead-Acid (~€80-120): Direct replacement, 3-4 year lifespan
- Ohmmu/Antigravity Lithium Upgrade (~€250-350): Lighter, 8+ year lifespan, popular upgrade
12V Lithium-ion vehicles (late 2021–2023):
- Tesla OEM Lithium (~€200-300): Must match chemistry (NMC or LFP)
- Tesla recommends attempting recovery before replacement—these batteries can often be revived
Choosing the Right 12V Battery: 2026 Buying Guide
This is where most DIYers get confused. Picking the wrong battery is an expensive mistake. Here's exactly what to buy for your vehicle.
Step 1: Identify Your Battery System
| Year & Model | Battery Type | Action |
|---|---|---|
| Model 3 / Y pre-late 2021 | 12V Lead-Acid | Replace with lead-acid or upgrade to lithium |
| Model 3 / Y late 2021–2023 | 12V Lithium-Ion | Must use lithium (NMC or LFP compatible) |
| Model S pre-2021 | 12V Lead-Acid | Replace with lead-acid (OEM spec: Group 51R) |
| Model S 2021+ | 12V Lithium | OEM Tesla lithium only |
| Model X | 12V Lead-Acid / Lithium | Year-dependent, same logic as S |
| Model 3 Highland / Y Juniper 2024+ | 16V Lithium | Tesla service only (no DIY procedure yet) |
If unsure of your build date, check Controls → Software → Additional Vehicle Information on your touchscreen.
Lead-Acid Options (Pre-Late 2021 Vehicles)
Budget pick — Direct OEM Replacement (~€60–90)
Any 12V AGM battery meeting the OEM spec (Group 51R / DIN 45Ah 400A) works. Brands like Bosch S5 or Varta Blue Dynamic are widely available at auto parts stores. Lifespan: 3–5 years.
Premium upgrade — Lithium (Ohmmu / Antigravity) (~€250–350)
Swapping to a lithium battery is a popular upgrade even on pre-2021 cars that originally came with lead-acid. Benefits:
- Weight: ~3 kg vs ~10 kg — noticeable frunk lightening
- Lifespan: 8–12 years vs 3–5 for lead-acid
- Discharge resistance: Handles Sentry Mode overnight without damage
- No modification needed: The Tesla DC-DC converter handles charging both chemistries
The Ohmmu 12V Lithium (US) is the most commonly used aftermarket lithium upgrade and drop-in compatible with all pre-2024 Teslas.
12V Lithium Options (Late 2021–2023 Vehicles)
For cars that came from the factory with a 12V lithium battery, you must replace like-for-like. The charging algorithm is tuned for lithium chemistry. Options:
- Tesla OEM replacement — order via the Tesla app or service center (~€200–300). Most reliable option, guaranteed compatible
- RR Car Parts OEM — check stock here — EU-based OEM supply, often faster shipping than Tesla's parts network
Never install a lead-acid battery in a vehicle designed for lithium. The DC-DC converter will overcharge the lead-acid unit, damaging it and potentially causing other electrical issues.
What to Avoid
- No-brand batteries from unknown Amazon sellers with suspiciously low prices — 12V battery failures strand you, and you won't be near a shop
- "Universal" battery packs that don't specify chemistry compatibility
- Any listing without clear Ah (amp-hour) and CCA (cold cranking amps) ratings
Step-by-Step Replacement Guide
Model 3 and Model Y
Step 1: Access the Battery Compartment
The 12V battery is located in the front trunk (frunk) on the right side, under a plastic cover.
- Open the frunk
- Remove the plastic storage bin (just lifts out)
- Locate the black plastic cover on the right side
- Remove the clips securing the cover using plastic pry tools
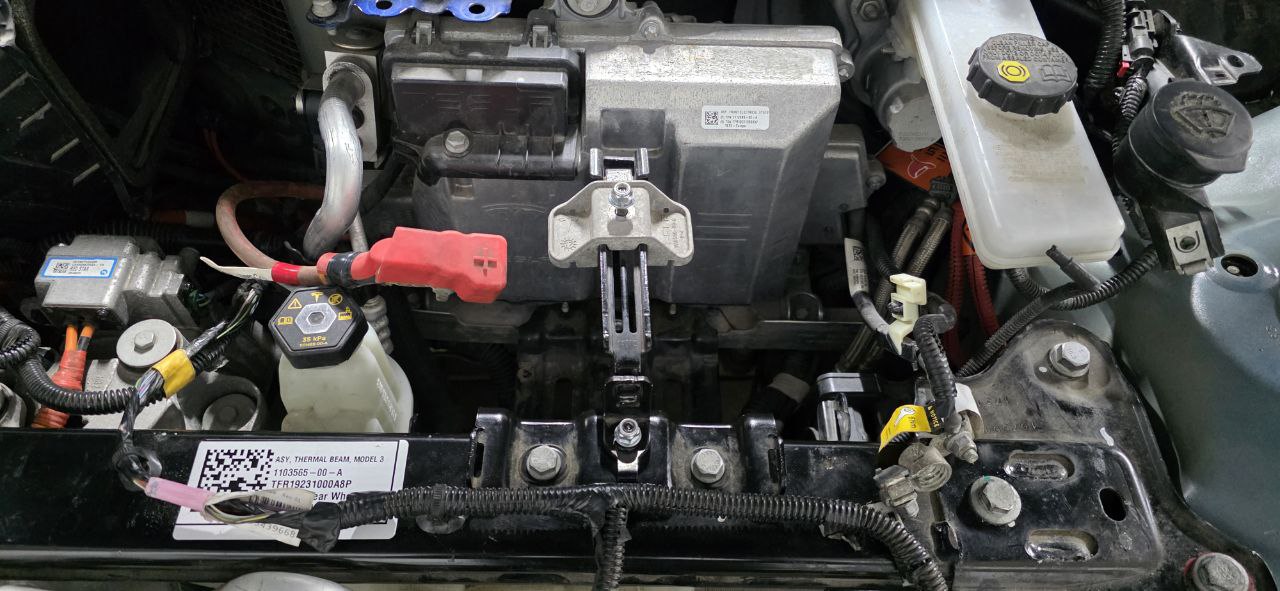 Close-up of the 12V battery area. Note the red positive terminal cover, brake fluid reservoir (yellow cap), and the "THERMAL BEAM MODEL 3" label on the structural component.
Step 2: Disconnect the High-Voltage System (Recommended)
Before touching the 12V battery, it's best practice to disconnect the "penthouse" connector. This prevents the DC-DC converter from supplying power during the swap and stops the car from trying to wake up mid-replacement.
- Fold down the rear seat (passenger side)
- Locate the orange high-voltage connector (the "penthouse")
- Unplug the connector—it simply pulls apart
- This isolates the HV system safely for service work
Step 3: Disconnect the Old Battery
- Use a 10mm socket to loosen the negative (black) terminal first
- Move the negative cable aside
- Loosen the positive (red) terminal
- Remove the positive cable
- Remove the battery hold-down bracket (10mm bolts)
- Carefully lift out the old battery
Step 4: Install the New Battery
- Lower the new battery into position
- Reinstall the hold-down bracket
- Connect the positive (red) terminal first
- Connect the negative (black) terminal last
- Tighten both terminals securely
Step 5: Reconnect and Reassemble
- Reconnect the penthouse connector under the rear seat
- Exit Transport Mode if you enabled it
- Replace the plastic cover in the frunk
- Reinstall the storage bin
- Close the frunk
- The car should wake up immediately
- Check for any warning messages on the screen
Model S and Model X
The process is similar but the battery location differs:
Model S (Pre-2021): Battery is located in the frunk, similar position to Model 3 Model S (2021+): Battery is under the rear seat Model X: Battery is under the second-row seats
For these models, you'll need to remove additional trim pieces to access the battery.
After Replacement
Once the new battery is installed:
- Let the car sit for 10-15 minutes to allow systems to initialize
- Check for error messages - some may need to be cleared
- Reset the BMS (Battery Management System) by leaving the car asleep for 8+ hours
- Update settings if any were reset (clock, driver profile, etc.)
Model S and Model X: Full Steps
The process differs from Model 3/Y because the battery is in a different location and requires more trim removal.
Model S (Pre-2021 — Frunk Battery)
- Open the frunk
- Remove the frunk carpet liner (clips and Torx screws at the edges)
- The 12V battery sits on the driver's side behind a plastic cover
- Disconnect the negative terminal first, then positive
- Remove the hold-down strap (10mm bolt)
- Lift out the battery — it's heavier than the Model 3 unit (~10kg)
- Install new battery, connect positive first, then negative
- Torque terminal clamp bolts to 4 Nm — firm but don't crack the posts
Model S (2021+ — Under Rear Seat)
- Fold or remove the rear seat bottom cushion (pull the two front straps up and tilt forward)
- Remove the trim panel behind the seat to expose the battery tray
- Disconnect the 12V battery connector (this model uses a proprietary connector, not bare terminals)
- Remove the mounting bolts and lift out the battery
- These are lithium-ion batteries from the factory — use only OEM or verified-compatible replacements
Model X (Under Second-Row Seats)
- Remove the second-row seat if needed (they're heavy — get a second person)
- Peel back the carpet to expose the battery access panel
- The battery uses the same disconnect/reconnect process as Model S 2021+
- Some X owners report needing a T30 Torx for the panel screws — have one ready
Can You Revive a Dead 12V Lithium Battery?
For 2021–2023 vehicles with the 12V lithium battery, Tesla recommends attempting recovery before replacement. The lithium chemistry can enter a deep discharge state (below 8V) that looks like a dead battery but can often be revived.
Recovery procedure:
- Connect a smart charger set to 12V lithium mode (not standard lead-acid mode)
- Apply a gentle charge at 0.5–1A for 2–4 hours to bring voltage above 10V
- Once above 10V, let the car's DC-DC converter finish the job
- Tools: NOCO Genius 10 smart charger (US link) handles this automatically with its "Force Mode"
If the battery won't hold above 11.5V after a full charge cycle, it's genuinely dead and needs replacement.
2024+ Models: The 16V System Explained
The Model 3 Highland and Model Y Juniper switched to a 16V lithium auxiliary battery. Here's what's different:
- Voltage: 15–16.8V resting (vs. 12–13.5V for older systems)
- Location: Varies — check your model-specific service manual
- Compatibility: Not interchangeable with 12V batteries. A 12V battery in a 16V system will damage electronics
- DIY status: Tesla has not published the replacement procedure publicly yet. Some independent shops have done it, but OEM parts availability is limited as of early 2026
- Symptom difference: The 16V system has better low-battery protection, so you may get more warning before complete failure
If you have a 2024+ vehicle showing 12V battery warnings, take it to Tesla service or a certified EV shop for now.
Cybertruck 12V Battery: What You Need to Know
The Cybertruck uses a fundamentally different low-voltage architecture compared to every other Tesla. Understanding it upfront will save you from ordering the wrong part or attempting a DIY that isn't yet feasible.
Cybertruck Uses a 48V Electrical System
Unlike all other Tesla models that use a 12V (or 16V) auxiliary battery, the Cybertruck runs on a 48V low-voltage architecture — a first for any consumer vehicle in this class. This higher voltage allows Tesla to use thinner wiring, reduce resistive losses, and power the truck's massive onboard electrical loads (air compressor, power outlets, winch provisions) more efficiently.
There is no 12V auxiliary battery in the Cybertruck to replace.
What Powers Cybertruck Accessories Instead?
A dedicated 48V DC-DC converter steps voltage down from the main high-voltage pack to supply the 48V bus. From there, a secondary converter supplies 12V and 5V rails for legacy components like USB ports and some infotainment sub-systems.
Practical implications for owners:
- No traditional jump-starting procedure — the Cybertruck doesn't have external 12V terminals like Model 3/Y
- If the truck loses all low-voltage power, you'll need Tesla Roadside Assistance or a service center
- Aftermarket 12V battery upgrades (Ohmmu, Antigravity) are not applicable to the Cybertruck
- Third-party diagnostic tools that read the 12V bus health may show unusual readings — this is expected
Cybertruck Low-Voltage Warning Signs
Even without a traditional 12V battery, the Cybertruck will still show low-voltage alerts if the 48V system has an issue:
- "Low Voltage Power System Fault" — the 48V converter or its associated circuitry has detected an issue
- Accessories losing power — USB hubs, cabin lighting, or displays flickering
- Touchscreen reboot loop — the infotainment 12V sub-rail may be dropping
If you see any of these, contact Tesla Service. Unlike the swappable 12V battery on older Teslas, Cybertruck low-voltage issues require shop diagnosis.
Future DIY Outlook
As the Cybertruck ages into its 4–5 year range (2027–2028 for the first delivery owners), third-party repair documentation will expand. Tesla's service manual for the Cybertruck covers the 48V architecture in detail, but the replacement procedures for converter modules are not yet standardized for independent shops. Watch the TMC forums for community-sourced repair procedures as they emerge.
Torque Specifications for 12V Battery Work
Getting torque specs right matters — overtightening battery terminals cracks the posts (an expensive mistake), and undertightening causes resistance that generates heat. Here's the complete table for all models.
| Component | Torque | Notes |
|---|---|---|
| Battery terminal clamp bolts (Model 3/Y, lead-acid) | 4 Nm | 10mm bolt — firm hand-tight + ~90° turn |
| Battery terminal clamp bolts (Model 3/Y, lithium) | 4 Nm | Same spec, different chemistry |
| Battery terminal clamp bolts (Model S pre-2021) | 4 Nm | Don't exceed — cast terminal posts crack |
| Battery hold-down bracket bolt (Model 3/Y) | 6–8 Nm | Secures the battery tray in the frunk |
| Battery hold-down strap bolt (Model S) | 8 Nm | 10mm bolt, single point |
| Frunk liner Torx screws (Model S) | 3 Nm | T20 Torx, don't strip plastic bosses |
| Model X battery panel screws | 4 Nm | T30 Torx — have this bit ready |
Pro tip on tools: A basic click-type torque wrench like this one (Amazon DE) / Amazon US set to the 0–25 Nm range covers all of these. If you don't have one, "snug plus a quarter turn" on terminal bolts is the closest manual approximation — but a torque wrench is the right tool for a €400+ repair.
Source: Tesla Model 3, Model S, and Model X Service Manuals (publicly available at service.tesla.com for registered users).
Monitoring Your New Battery: The First 30 Days
After a 12V battery replacement, the first month is when you'll catch any issues early — before a warning strands you again. Here's what to watch for and how to confirm the swap worked correctly.
Day 1: Voltage Sanity Check
As soon as the car wakes up after installation, measure the 12V terminals with a multimeter. With the car active and the DC-DC converter running, you should see:
- Lead-acid system: 13.5–14.2V (converter actively charging)
- 12V lithium system: 13.5–14.5V
- 16V lithium system (2024+): 15.5–17.0V (if applicable)
If you see under 13V with the car fully on, the DC-DC converter may not be supplying charge — which would mean a separate issue unrelated to the battery. Check Service Mode → HV Battery → 12V Supply Voltage for real-time converter output readings.
Days 2–7: No Warning Messages
A healthy new battery should generate zero 12V-related alerts. If you see "12V Battery Low" within the first week, the new battery may be defective, or you may have a Sentry Mode drain issue — not a battery problem. Use Service Mode to check Service Alerts for any flagged 12V events.
Common false-alarm scenarios after replacement:
- One-time BMS recalibration alert: Harmless, clears itself within 24 hours as the BMS learns the new battery's characteristics
- "Service Required" after 16V replacement: Expected — Tesla flags voltage range changes; a service center can clear this with a scan tool
Week 2–4: Sentry Mode Drain Test
If you use Sentry Mode regularly, verify the new battery handles overnight drain. Check the touchscreen battery level (via the app) before bed and again in the morning without charging. A healthy 12V system should:
- Lose no more than 2–5% of HV range from Sentry Mode overnight
- Show no "12V Battery Low" in the morning after a cold night
- Recover immediately when you unlock and sit in the car
If you're seeing higher-than-expected drain, see our Tesla Phantom Battery Drain Fix guide — the culprit is often an app or setting keeping the car awake, not the 12V battery itself.
One Month Check: Log Your Resting Voltage
After 30 days of normal use, test resting voltage one more time (car fully asleep, no charger, parked for 30+ minutes). Record it. This becomes your baseline — if you ever suspect the battery again in the future, you'll know what "healthy" looks like for your specific unit.
How Long Does a Tesla 12V Battery Last?
- Lead-Acid batteries: 3–5 years typically; less in extreme heat (Southern Europe, Middle East)
- 12V Lithium batteries: 7–10+ years expected
- 16V Lithium batteries: Too new to have long-term data; Tesla claims 10+ years
- Heavy Sentry Mode use is the #1 killer of 12V batteries — see our phantom battery drain guide for how to minimize this
- Extreme cold (below -20°C) temporarily reduces capacity but doesn't permanently damage lithium units
Testing Battery Voltage Before and After Replacement
A multimeter takes 30 seconds and tells you exactly what you're dealing with. Get a decent one — the Fluke 107 or any auto-ranging unit from Amazon DE / Amazon US works fine.
Voltage Reading Guide
| Reading | Chemistry | What It Means |
|---|---|---|
| 12.6–13.0V | Lead-Acid (resting) | Healthy, fully charged |
| 12.0–12.5V | Lead-Acid | Partially discharged — charge before testing |
| Below 11.5V | Lead-Acid | Dead or dying — replace |
| 13.5–14.0V | Lithium 12V (resting) | Healthy |
| 12.0–13.0V | Lithium 12V | Partially discharged |
| Below 10V | Lithium 12V | Deep discharge — attempt recovery first |
| 15.5–16.8V | 16V Lithium (2024+) | Healthy |
| Below 14V | 16V Lithium | Low — Tesla service needed |
When to Test
Before replacement: Test resting voltage with the car fully asleep (30+ minutes idle, no charger). This confirms whether the battery is actually the problem or if you have a phantom drain issue pulling it down.
After replacement: Test with the car awake. You should see the DC-DC converter pushing 13.5–14.5V into the 12V system — that's the charger keeping the new battery topped up. If you're seeing below 12V with the car running, suspect a DC-DC converter issue.
Load test: If you suspect a lithium battery that passes voltage tests but still causes problems, a proper load test under ~50A draw will expose cells that drop under load. Most battery shops will do this for free.
Common Mistakes to Avoid
- Wrong terminal order — always negative first when disconnecting, negative last when connecting
- Wrong battery type — never put a lead-acid in a lithium-compatible car or vice versa
- Skipping the penthouse disconnect — the DC-DC converter can push voltage while you work; disconnecting it prevents surprises
- Overtightening terminal clamps — 4 Nm is enough; cracked battery posts are expensive
- Forgetting Transport Mode — if the car wakes up mid-swap, it can trigger HV system checks
Cost Comparison (2026 Prices)
| Option | Cost (EU) | Cost (US) | Notes |
|---|---|---|---|
| Tesla Service Center | €250–€400 | $250–$400 | Labor + markup |
| DIY Lead-Acid | €60–€100 | $60–$100 | Easy, 3–5 yr lifespan |
| DIY Lithium (OEM) | €180–€280 | $200–$300 | Longer lifespan, must match chemistry |
| DIY Lithium (Ohmmu/Antigravity) | €280–€350 | $300–$350 | Premium aftermarket, 8+ yr lifespan |
| OEM from RR Car Parts | Check price | — | EU stock, OEM spec |
By doing this repair yourself, you save at least €150–€250 vs. Tesla service, and you'll know exactly what battery was installed.
Have questions about this repair? The process is straightforward, but every car is slightly different. Always consult your owner's manual for model-specific details. For a full list of when to replace what, check our Tesla maintenance schedule.
FAQ
Q: How much does it cost to replace a Tesla 12V battery? A Tesla service center charges $250–$400+ including labor. DIY costs $60–$120 for lead-acid or $180–$300 for OEM lithium. You save at least $150–$200 doing it yourself.
Q: Can I replace my Tesla 12V battery myself? Yes — for all pre-2024 vehicles (Model 3, Y, S, X). It takes 30–60 minutes and only needs a 10mm socket and pry tools. No special Tesla tools required. The 2024+ 16V system is more complex.
Q: What happens when a Tesla 12V battery dies completely? The car goes completely dark — app won't connect, doors won't respond, screen stays black. The main battery is still full but can't power anything without the 12V system. You need to manually open the frunk and jump the 12V terminals to revive it.
Q: How long does a Tesla 12V lithium battery last? 7–10+ years under normal use. Lead-acid (pre-2021) lasts 3–5 years. Heavy Sentry Mode use and extreme temperatures reduce lifespan. Below 11.5V at rest = replace soon.
Q: Can I jump-start a Tesla with a dead 12V battery? Yes. On Model 3/Y, connect 12V to the terminals behind the front bumper tow hook cover. This wakes the car enough to open the frunk so you can replace the battery. Never touch orange cables. Never use 24V. See the emergency door release guide if you're completely locked out.
Q: Does the Cybertruck have a 12V battery to replace? No — the Cybertruck runs on a 48V low-voltage architecture. There's no user-replaceable auxiliary battery. Low-voltage faults on a Cybertruck require Tesla Service or a certified EV shop. The Ohmmu/Antigravity lithium upgrades that work on older Teslas are not applicable.
Q: What torque do I use for the terminal bolts? Tesla specifies 4 Nm for all 12V terminal clamp bolts (positive and negative) on Model 3, Y, S, and X. The hold-down bracket bolt is 6–8 Nm. Overtightening cracks the cast terminal posts — use a proper torque wrench, not just "as tight as possible."
Q: Should I upgrade to a lithium 12V battery? If your pre-2021 Tesla has lead-acid, a lithium upgrade (Ohmmu/Antigravity) is worthwhile: 8–12 year lifespan, ~7 kg lighter, and it handles Sentry Mode overnight without dying. Cost is €250–350 vs €60–90 for lead-acid, but you'll pay for it once vs twice over 8 years.
Official References
For the complete official procedure, see the Tesla Model 3 Service Manual - 12V Battery Replacement (requires Tesla account).
Related Guides
- Tesla Emergency Door Release — How to get into a Tesla with a completely dead battery
- Tesla Screen Black Fix — If your screen went dark before or after battery replacement
- Tesla Won't Start or Turn On — Full dead-car recovery procedure
- Tesla Phantom Battery Drain Fix — How to stop killing your 12V battery with Sentry Mode
- Tesla Service Mode Guide — Check live 12V supply voltage and service alerts without a multimeter
- BMS Calibration & Battery Recalibration — What to do if the battery gauge is off after replacement
- Key Fob Battery Replacement — Another battery that needs periodic replacement
- Tesla Warning Lights & Error Messages Guide — Understand every warning on your Tesla screen
- Tesla Pyrofuse Explained — The HV safety fuse that blows when the 12V system fails
- Tesla Battery Degradation Guide — How healthy is your main battery pack?
- Tesla OBD2 Scanner & Diagnostics Guide — App-based monitoring of 12V health over time
- Tesla Flat Tire Repair Guide — Another roadside emergency guide every Tesla owner needs
- Tesla Maintenance Schedule 2026 — Full list of when to replace what

🛠️ Tools Needed for This Repair
These are the tools I personally use and recommend. Using quality tools makes the job easier and safer.
-
10mm Socket Wrench Set
-
Tesla 12V Replacement Battery (OEM Compatible)
-
Tesla 12V / 16V Battery (Original OEM) RR Car Parts 🇪🇺
-
Battery Terminal Cleaner
-
Plastic Pry Tools
-
Multimeter (for voltage testing)
-
iFixit Pro Tech Toolkit View on iFixit
-
iFixit Plastic Pry Tools View on iFixit
-
NOCO Genius 10 Smart Charger
-
Ohmmu 12V Lithium Battery Upgrade
-
Digital Multimeter (Voltage Testing)
-
Torque Wrench (0–25 Nm)
We earn commissions from qualifying purchases through our affiliate partners. This helps support the site at no extra cost to you.