Tesla Model 3/Y Front Bumper Removal Guide: Step-by-Step with Clip Locations
Removing the front bumper on a Tesla Model 3 or Model Y is one of those jobs that looks intimidating but is actually straightforward once you know where every clip, screw, and bolt hides. The bumper fascia is a single large plastic piece held on by a combination of Torx screws, 10mm bolts, and push-pin clips — no special Tesla tooling required.
This guide covers the 2017–2023 Model 3 (pre-Highland), the 2020–2024 Model Y, and notes the key differences for the 2024+ Model 3 Highland. The process takes about 30–60 minutes your first time, and under 20 minutes once you've done it before.
Why Would You Remove the Front Bumper?
There are plenty of reasons you might need the bumper off:
- Paint repair or touch-up — Access to the full surface for proper paint chip repair or respray
- PPF installation — Many PPF installers wrap bumpers off the car for a cleaner result
- Fog light or turn signal replacement — The fog light assemblies sit behind the bumper fascia
- Parking sensor replacement — Ultrasonic parking sensors (USS) clip into the bumper from behind (pre-HW4 vehicles with USS)
- Front radar module access — The forward-facing radar sits behind the lower bumper area
- Headlight removal — You need the bumper off to access headlight mounting bolts for a full headlight replacement
- Tow hook access — While the tow hook cover pops off separately, some tow hook repairs require bumper removal
- Collision repair — Minor fender bender? The bumper is often the only damaged part
- Aftermarket bumper installation — Upgrading to a performance or custom fascia
Difficulty Rating
Medium — No special skills needed, but you're working with fragile plastic clips and electrical connectors. A helper makes the final pull-off easier. If you've done basic automotive work before, this is well within your ability.
Time estimate: 30–60 minutes (first time) · 15–20 minutes (experienced)
Tools You'll Need
Here's what to have ready before you start:
| Tool | What It's For |
|---|---|
| Trim removal tools / plastic pry tools | Popping push clips without breaking them |
| T20, T25, T30 Torx bits | Wheel well liner screws, upper bumper screws |
| T40 Torx bit | Underbody fasteners (2024 Highland) |
| 10mm socket + ratchet | Bolts behind wheel arch liner and along bumper top |
| Ratchet extension (6–8") | Reaching recessed bolts behind the fender liner |
| Painter's tape | Protecting fender edges from scratches |
| Moving blanket or soft cloth | Setting the bumper down without scratching it |
| Flashlight / headlamp | Seeing into wheel wells and under the car |
| Spare push clips | Clips break — have extras on hand |
Pro tip: Buy a pack of spare push-pin clips before you start. They cost a couple of dollars and at least one or two will break during removal. It's not a question of if, but which ones.
Before You Start
- Park on a flat surface with plenty of room in front of the car. You'll need space to set the bumper down.
- Lifting the car is optional but recommended. Having the car on a jack or ramps gives much better access to the underbody fasteners. If you're working on flat ground, you can manage — you'll just spend more time on your back.
- Apply painter's tape along the edges of both front fenders where the bumper meets the body. This prevents scratches when the bumper slides off.
- Open the frunk. You need access to the top fasteners where the bumper meets the frunk tub area.
- Have a helper available for the final step. The bumper is large and unwieldy. Two people makes the pull-off and wiring disconnect much easier.
Step-by-Step: Front Bumper Removal
Step 1: Remove the Frunk Liner / Trim Panel
Open the frunk and remove the front trim panel that sits at the very front of the frunk tub. This is typically held in by plastic push clips. Gently pry them up with a trim tool and lift the panel out.
On some models, you'll also want to peel back the frunk carpet/liner at the front edge to access the mounting bolts underneath.
Step 2: Remove the Upper Bumper Fasteners
With the frunk trim out of the way, you'll see the top edge of the bumper where it meets the body. Here you'll find:
- Bolts (10mm) running along the top of the bumper — typically 4–6 bolts depending on model year
- On pre-2021 Model 3, these are accessible once the frunk liner is pulled forward
Remove all upper bolts, but consider leaving one center bolt finger-tight temporarily. This keeps the bumper from dropping forward while you work on the sides and bottom — a trick that saves a lot of frustration.
Step 3: Remove the Wheel Well Liner Fasteners (Both Sides)
This is where most people get stuck. The bumper fasteners are hidden behind the front portion of the wheel well liners.
Turn the steering wheel fully to one side to open up the wheel well you're working on. Then:
- Remove the push clips (typically 3–5 per side) securing the front section of the wheel well liner to the bumper. Use a trim tool to pop the center pin, then pull the clip body out.
- Remove the Torx screws (T20 or T25) along the front edge of the liner — usually 2 screws per side inside the wheel well.
- Peel back the liner to expose the hidden fasteners behind it.
- Remove the 10mm nut/bolt hidden behind the wheel arch liner near the air guide — one per side. This is the one everyone misses. It's recessed and you'll need a ratchet extension to reach it.
Repeat on the other side (turn the steering wheel the opposite direction).
⚠️ Common mistake: People forget the bolt hidden behind the fender liner. If the bumper feels like it's still stuck after you've removed everything else, this is almost certainly the one you missed. It sits behind the liner, near where the bumper wraps around into the fender area.
Step 4: Remove the Lower / Underbody Fasteners
Get under the car (this is where a lift or jack helps enormously). Look at the bottom edge of the bumper:
- Push-pin clips along the lower valance/undertray area — remove these with a trim tool
- Torx screws (T30 or T40 on Highland) securing the bumper's lower edge — typically 4–6 screws running along the bottom
- On vehicles with an aero shield/underbody panel, you may need to remove or partially detach it first to access the bumper screws behind it
Remove all lower fasteners. Keep the screws organized — they may be different lengths.
Step 5: Release the Side Clips (The Tricky Part)
With all bolts and screws removed, the bumper is now held on only by friction clips where it meets the fenders on each side. These are the clips that cause the most anxiety.
There are retaining clips at the top of the bumper where it meets each fender — typically one clip per side that slides into a square receiver on the fender. These don't have an external release mechanism — you simply need to pull the bumper straight forward and outward to release them.
How to release the side clips:
- Start on one side. Place your hands at the seam where the bumper meets the fender.
- Pull the bumper gently but firmly forward and slightly outward (away from the car).
- You'll hear a pop as the clip releases. That's normal.
- Move to the other side and repeat.
- The bumper should now be loose and hanging by the electrical connectors.
⚠️ Don't yank! The bumper still has wiring harness connectors attached. Once the clips pop, support the bumper and move to the next step.
Step 6: Disconnect the Electrical Connectors
With the bumper loose, carefully pull it forward just enough to access the wiring. You'll find:
- Bumper wiring harness connector — This is the main connector that feeds the parking sensors, fog lights, and any other bumper electronics. It's typically a single multi-pin connector (or sometimes two connectors). Squeeze the release tab and pull apart.
- Fog light / turn signal connectors — If your car has fog lights, there may be individual connectors for each side. Look for the red locking tab — pull the red tab away from the connector to release, then squeeze and disconnect.
- Parking sensor harness (pre-HW4 vehicles) — This runs along the inside of the bumper to the ultrasonic sensors. It may be part of the main harness connector.
- Pedestrian warning speaker (PWS) — On vehicles equipped with a pedestrian warning speaker mounted on the lower valance, disconnect its connector before fully removing the bumper.
Pro tip: Take a photo of each connector before disconnecting. This makes reinstallation foolproof.
Step 7: Remove the Bumper
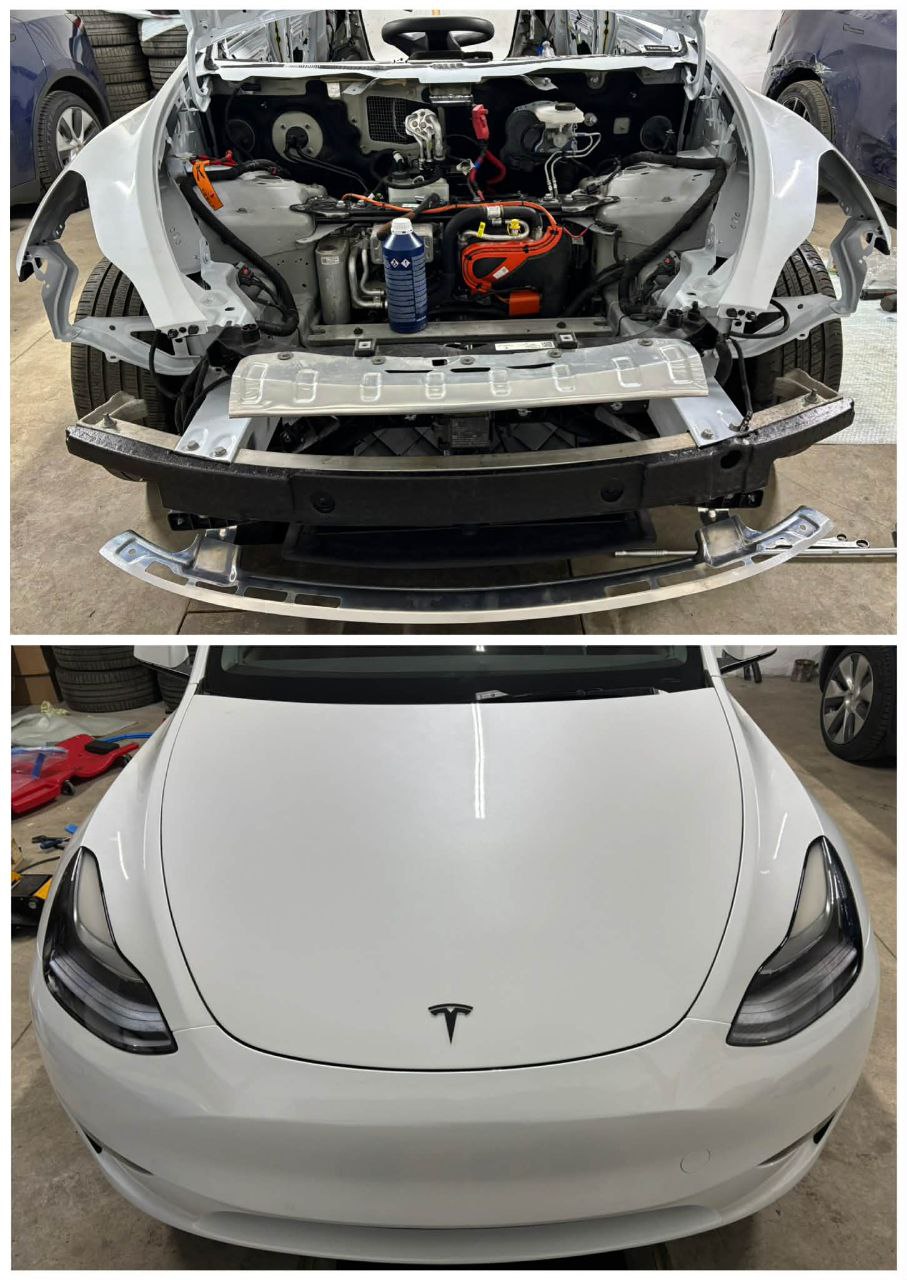
With all electrical connections undone, you can now fully remove the bumper. Have your helper grab one end while you grab the other. Lift it forward and away from the car, then set it face-down on a moving blanket or soft surface.
Congratulations — the bumper is off!
Fastener Map: Quick Reference
Here's a summary of all the fasteners you'll encounter:
| Location | Fastener Type | Quantity (approx.) | Tool Needed |
|---|---|---|---|
| Top edge (under frunk) | 10mm bolts | 4–6 | 10mm socket |
| Wheel well (liner clips) | Push-pin clips | 3–5 per side | Trim tool |
| Wheel well (liner screws) | Torx screws | 2 per side | T20/T25 |
| Behind liner (hidden) | 10mm bolt/nut | 1 per side | 10mm + extension |
| Bottom edge | Torx screws | 4–6 | T30 (T40 on Highland) |
| Bottom edge | Push-pin clips | 4–6 | Trim tool |
| Side clips (fender) | Friction/snap clips | 1 per side | Pull by hand |
| Electrical | Harness connectors | 1–3 | Squeeze tab |
Total fasteners: approximately 25–35 depending on your model year and configuration.
Model Y vs. Model 3: Key Differences
The Model 3 and Model Y share the same basic bumper design and removal process, but there are some differences to note:
- Bumper shape and size: The Model Y bumper is larger and slightly heavier due to the bigger vehicle body. Having a helper is more important.
- Fascia grille clips: The Model Y service manual references 9 clips attaching the front fascia grille to the bumper fascia. The Model 3 has a similar count.
- Fog light access: The Model Y service manual calls out 9 clips on the wheel arch liner front section for fog light access, compared to fewer on the Model 3.
- Radar module location: Same position on both models (behind the lower center of the bumper), but Model Y's slightly taller ride height makes underbody access a bit easier.
- Pedestrian warning speaker: Both models may have this on the lower valance, but mounting position varies slightly.
- Fastener torque values are the same across both models.
The step-by-step process above works for both vehicles.
Pre-2021 vs. 2021+ (Refresh) vs. 2024 Highland
Pre-2021 Model 3
- Original design with T30 Torx screws on the bottom
- Fog lights are standard (round style)
- 6 ultrasonic parking sensors across the front bumper
- Simpler wiring harness
2021+ Model 3/Y Refresh
- Same basic fastener layout
- Some vehicles dropped USS parking sensors (HW4 / Tesla Vision)
- If your car has no USS, the bumper harness connector is simpler
- Radar module may or may not be present depending on build date
2024+ Model 3 Highland
- Redesigned front bumper with updated styling
- Uses T40 Torx for underbody screws (instead of T30)
- Different frunk tub design — access to upper bolts may require removing additional trim
- Fog light / turn signal design is integrated differently
- The overall removal process is the same, just note the different Torx size
Reinstallation Tips
Putting the bumper back on is the reverse of removal, but keep these tips in mind:
- Reconnect all electrical connectors first before pushing the bumper into place. It's much harder to reach them once the bumper is seated.
- Align the side clips first. Guide the bumper's side clip tabs into their receivers on the fenders before pushing anything home.
- Push the bumper firmly into place until you hear the side clips snap in. The fender seam should be even and consistent.
- Start all bolts by hand before tightening any of them. This ensures proper alignment.
- Tighten in a cross pattern — top center first, then sides, then bottom — to ensure even fitment.
- Check panel gaps around the bumper-to-fender seam and bumper-to-hood gaps. They should be consistent side to side. If not, loosen and adjust before final tightening.
- Don't forget the hidden 10mm bolt behind each fender liner — the same one you probably almost missed during removal.
- Test all lights and sensors once reassembled. Turn on the car and verify fog lights, turn signals, and parking sensors all work.
Common Mistakes to Avoid
❌ Forcing the side clips — If the bumper won't release, you missed a fastener. Go back and double-check rather than pulling harder and cracking the bumper.
❌ Forgetting the hidden fender liner bolt — This 10mm bolt behind each wheel well liner is the #1 missed fastener. The bumper will feel stuck on one side if you miss it.
❌ Not supporting the bumper during disconnect — Once the side clips are released, the bumper is only held by the wiring harness. Don't let it hang by the wires — support it or have someone hold it.
❌ Breaking push clips — Use proper trim tools, not screwdrivers. Flat-blade screwdrivers crack clip heads. Buy spare clips before you start.
❌ Scratching the fenders — Painter's tape on the fender edges takes 30 seconds and prevents regret. The bumper will slide against the fender during removal.
❌ Working without a jack — You can do this on flat ground, but the underbody screws are much harder to reach. Even a simple set of ramps makes a huge difference.
❌ Not photographing connectors — One photo of each connector before disconnecting saves 15 minutes of guessing during reinstallation.
When to Call a Professional
This is a solid DIY job, but consider professional help if:
- Your bumper was hit hard enough that the bumper beam or crash structure behind the fascia may be damaged — removing the fascia reveals this, but repair is not DIY territory
- You need radar recalibration after reinstalling (required if the radar module was removed or repositioned)
- The paint needs professional blending or the bumper requires refinishing
- You're uncomfortable working with electrical connectors — a broken connector tab means a replacement harness from Tesla
Related Guides
- Tesla Paint Chip Repair Guide — Fix chips on the newly accessible bumper surface
- Tesla Headlight Replacement Guide — With the bumper off, headlight access is easy
- Tesla PPF Installation Guide — Many PPF installers remove the bumper for a full wrap
- Tesla Headlight Condensation Fix — While the bumper is off, check your headlight seals
Final Thoughts
The Tesla Model 3 and Model Y front bumper removal is genuinely one of the easier bumper removal jobs in the automotive world. Tesla designed these cars with relatively few fasteners compared to traditional automakers, and there's nothing exotic about the hardware — just standard Torx screws, 10mm bolts, and plastic clips.
The key is knowing where every fastener hides (especially that sneaky bolt behind each fender liner) and being patient with the side clips. Take your time, use proper trim tools, and you'll have the bumper off in under an hour on your first attempt.
Once you've done it once, you'll wonder why body shops charge hundreds of dollars just for "bumper R&R" labor. This is a true DIY win.

🛠️ Tools Needed for This Repair
These are the tools I personally use and recommend. Using quality tools makes the job easier and safer.
-
Trim Removal Tool Set (Plastic Pry Tools)
-
Torx Bit Set (T20, T25, T30, T40)
-
10mm Socket + Ratchet
-
Ratchet Extension Bar (6-8 inch)
-
Painter's Tape (Fender Protection)
-
Jack and Jack Stands
-
Microfiber Towels
-
Replacement Push Clips (Tesla OEM Style)
-
Moving Blanket (Bumper Protection)
-
iFixit Pro Tech Toolkit View on iFixit
-
iFixit Plastic Pry Tools View on iFixit
We earn commissions from qualifying purchases through our affiliate partners. This helps support the site at no extra cost to you.