Tesla Control Arm Replacement: DIY Suspension Fix
The front upper control arms are one of the most common wear items on Tesla vehicles, especially Model 3 and Model Y. The factory design uses a ball joint that's prone to water ingress, leading to squeaks, clunks, and eventually play in the suspension. Here's how to diagnose and replace them yourself.
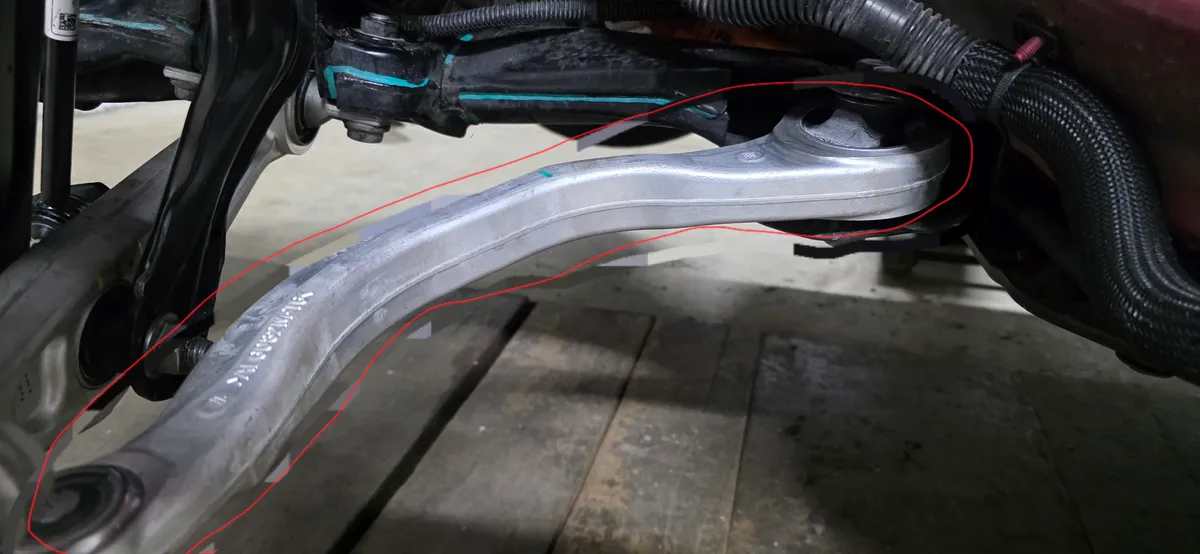 Front lower control arm (circled) — the aluminum casting connects the wheel hub to the subframe. Upper control arms fail more frequently but use similar construction.
Symptoms of Worn Control Arms
Audible Signs:
- Squeaking over bumps (especially when cold)
- Clunking when turning at low speeds
- Creaking during parking maneuvers (also check our creaking and rattling fix guide)
- Noise gets worse in wet weather
Handling Signs:
- Vague steering feel
- Wandering at highway speeds
- Uneven tire wear
- Car pulls to one side
Visual Inspection:
- Torn or damaged ball joint boot
- Visible rust around ball joint
- Movement when prying with a bar
Why Tesla Control Arms Fail
Tesla's original front upper control arm design has a known weakness:
- Water Ingress - The ball joint boot allows water in
- Corrosion - Water causes internal rust
- Lubrication Loss - Grease washes out or degrades
- Metal-on-Metal Contact - Creates noise and wear
Tesla has revised the design multiple times. Aftermarket options often use greaseable ball joints that can be maintained.
Parts Options
OEM Tesla Replacement:
- Same design as original (may fail again)
- Includes new ball joint boots
- Cost: $150-250 per arm
Upgraded Aftermarket:
- Greaseable ball joints (can be maintained)
- Often stronger design
- Cost: $100-200 per arm
- Brands: SPC, Mevotech, Moog
DIY Replacement Guide
Tools Required
- Floor jack (3+ ton capacity)
- Jack stands (rated for vehicle weight)
- Ball joint separator or pickle fork
- 18mm socket and wrench
- 21mm socket (lug nuts)
- Torque wrench
- Penetrating oil (PB Blaster)
- Wire brush
- Blue threadlocker
Step 1: Preparation
- Park on level ground
- Loosen front lug nuts (don't remove)
- Lift the front of the car with floor jack
- Secure on jack stands under the frame
- Remove front wheels
Step 2: Access the Control Arm
- Locate the upper control arm behind the wheel hub
- Spray all bolts with penetrating oil
- Wait 10-15 minutes for oil to work
- Wire brush any visible rust from bolts
Step 3: Disconnect the Ball Joint
Method A: Ball Joint Separator (Recommended)
- Remove the pinch bolt securing ball joint to knuckle (18mm)
- Position ball joint separator between knuckle and control arm
- Tighten separator until ball joint pops free
- Remove separator
Method B: Pickle Fork
- Remove pinch bolt
- Drive pickle fork between knuckle and ball joint
- Tap with hammer until joint separates
- Note: May damage boot (fine if replacing anyway)
Step 4: Remove the Control Arm
- Support the knuckle so it doesn't hang by brake line
- Remove the two bolts at the inner frame mount (18mm)
- Note the orientation of any alignment cams
- Remove the control arm
Step 5: Install New Control Arm
- Position new control arm in frame mount
- Hand-thread inner mounting bolts
- Insert ball joint stud into knuckle
- Install and hand-tighten pinch bolt
- Apply threadlocker to bolts if not pre-applied
Step 6: Torque to Specification
Torque Values (Model 3/Y) — verified against Tesla Service Manual (service.tesla.com) — March 2026:
- Inner mounting bolts (13mm): 35 Nm (25.8 ft-lb)
- Inner mounting bolts (15mm): 62 Nm (45.7 ft-lb)
- Ball joint pinch bolt: 56 Nm (41.3 ft-lb)
Tightening Order:
- Torque inner bolts first
- Then torque pinch bolt
- Lower car to ground (weight on wheels)
- Re-check torque values
Step 7: Repeat for Other Side
Mirror the process for the passenger side.
Post-Installation
Wheel Alignment
Critical: Control arm replacement changes suspension geometry. You must get a wheel alignment after this repair.
- Drive directly to alignment shop (within 10 miles)
- Expect to pay $80-150 for alignment
- Skipping alignment causes tire wear and poor handling
Test Drive
After alignment, test drive and check for:
- No clunks or squeaks
- Steering returns to center smoothly
- No pulling to either side
- No unusual vibrations
Maintenance Tips
For Greaseable Aftermarket Arms:
- Apply grease every 10,000 miles
- Use marine-grade grease for water resistance
- Pump until fresh grease exits the boot
Preventing Future Failure:
- Wash undercarriage regularly (removes road salt)
- Inspect boots annually for tears
- Address small tears with boot repair tape before water enters
Cost Comparison
| Option | Parts | Labor | Total |
|---|---|---|---|
| Tesla Service Center | $300-500 | $400-600 | $700-1,100 |
| Independent Shop | $200-400 | $200-400 | $400-800 |
| DIY (OEM Parts) | $300-500 | Free | $300-500 |
| DIY (Aftermarket) | $200-400 | Free | $200-400 |
Plus Alignment: Add $80-150 for wheel alignment (required regardless of who does the work).
Common Mistakes to Avoid
- Not replacing in pairs - Leads to unbalanced handling
- Skipping alignment - Causes rapid tire wear
- Over-torquing bolts - Can strip threads or crack components
- Reusing stretched bolts - Some bolts are torque-to-yield
- Not supporting the knuckle - Can damage brake lines
Control arm replacement is one of the more involved DIY repairs, but it's absolutely doable with basic mechanical skills. The key is taking your time, using proper tools, and always getting an alignment afterward.
Related Guides
- Jack Points & Lifting Guide - Safe lift points before suspension work
- Wheel Alignment DIY - Required after control arm replacement
- Suspension Noise Fix - Diagnose noises before replacing parts
- Creaking and Rattling Fix - Other sources of suspension noise
- Model X Half-Shaft Replacement - CV axle/drivetrain repairs

🛠️ Tools Needed for This Repair
These are the tools I personally use and recommend. Using quality tools makes the job easier and safer.
-
Floor Jack and Jack Stands
-
Ball Joint Separator
-
18mm Socket and Wrench
-
Torque Wrench
-
Tesla Front Upper Control Arms (Pair)
-
Tesla Control Arms (Original OEM) RR Car Parts 🇪🇺
-
iFixit Pro Tech Toolkit View on iFixit
We earn commissions from qualifying purchases through our affiliate partners. This helps support the site at no extra cost to you.