Tesla 12V Battery Replacement: Step-by-Step DIY (Save €200+)
The low-voltage battery in your Tesla is one of the most common components that will eventually need replacement. Despite having a massive high-voltage battery pack, every Tesla relies on a smaller auxiliary battery to power essential systems like the computer, door locks, and lights. When this battery fails, your Tesla won't start—even with a fully charged main battery.
Important: Tesla has used three different low-voltage battery types:
- Pre-late 2021: 12V lead-acid (replaceable with aftermarket options)
- Late 2021–2023: 12V lithium-ion (NMC or LFP chemistry)
- 2024+ (Highland, Juniper): 16V lithium-ion (completely different system)
This guide focuses on the 12V batteries. If you have a 2024+ vehicle with a 16V system, the replacement process and parts are different—check your owner's manual or Tesla service documentation.
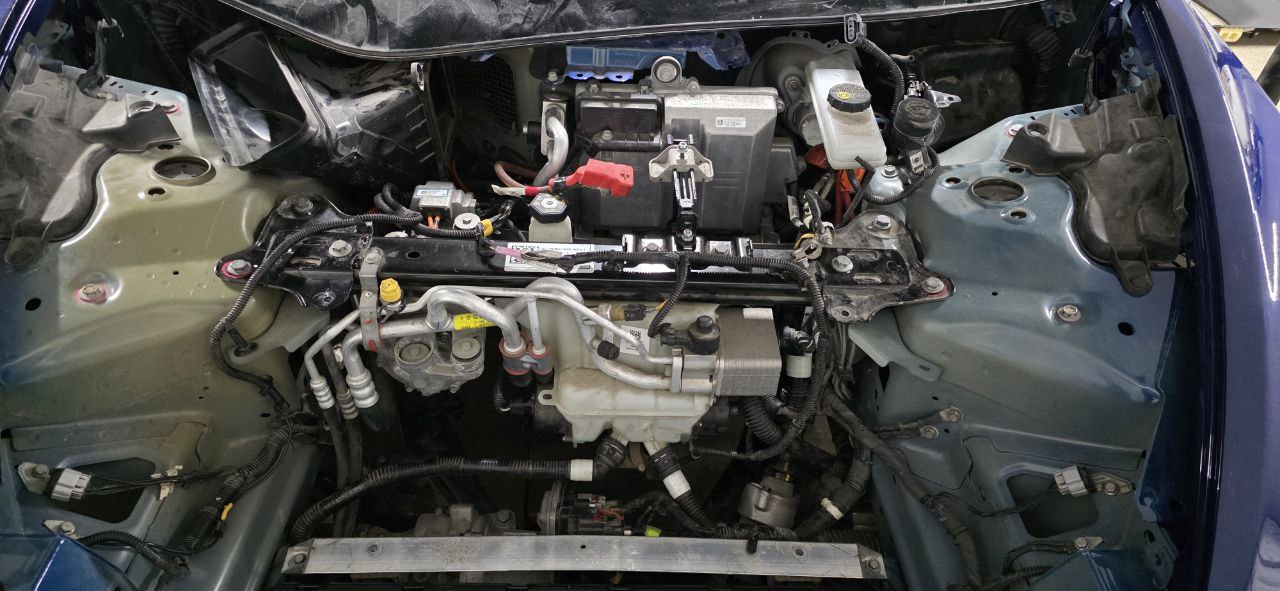 2018 Model 3 frunk with covers removed, exposing the thermal management system, brake fluid reservoir, and A/C compressor. The 12V battery sits under a cover on the right side.
Signs Your Tesla 12V Battery Needs Replacement
Before diving into the replacement process, here's how to know if your 12V battery is failing:
- "12V Battery Low" warning on your touchscreen (if your screen went black before the warning, the battery may already be dead)
- Car won't wake up or respond to the app
- Doors won't open with the key card or phone key
- Random system reboots while driving
- Clicking sound when trying to start
- The car loses settings overnight
What You'll Need
For this job, you'll need basic tools and about 30-60 minutes. Tesla service centers charge $200-400+ for this repair, but you can do it yourself for around $80-150 depending on the battery you choose.
Battery Options (for 12V systems only):
Lead-acid vehicles (pre-late 2021):
- OEM Lead-Acid (~€80-120): Direct replacement, 3-4 year lifespan
- Ohmmu/Antigravity Lithium Upgrade (~€250-350): Lighter, 8+ year lifespan, popular upgrade
12V Lithium-ion vehicles (late 2021–2023):
- Tesla OEM Lithium (~€200-300): Must match chemistry (NMC or LFP)
- Tesla recommends attempting recovery before replacement—these batteries can often be revived
Step-by-Step Replacement Guide
Model 3 and Model Y
Step 1: Access the Battery Compartment
The 12V battery is located in the front trunk (frunk) on the right side, under a plastic cover.
- Open the frunk
- Remove the plastic storage bin (just lifts out)
- Locate the black plastic cover on the right side
- Remove the clips securing the cover using plastic pry tools
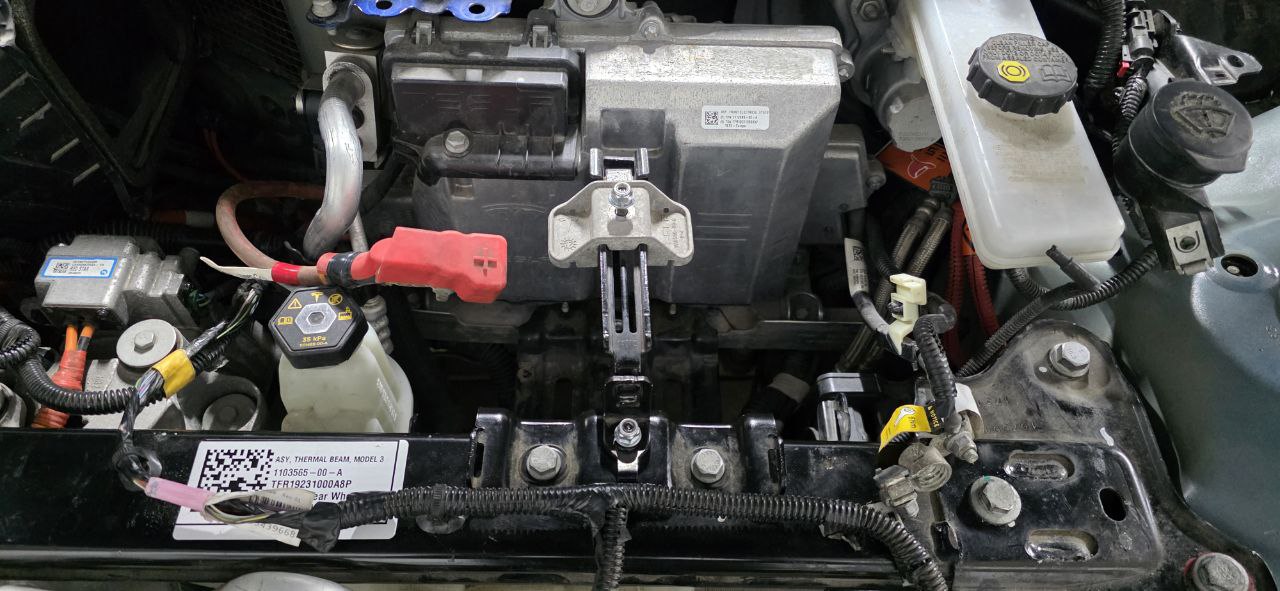 Close-up of the 12V battery area. Note the red positive terminal cover, brake fluid reservoir (yellow cap), and the "THERMAL BEAM MODEL 3" label on the structural component.
Step 2: Disconnect the High-Voltage System (Recommended)
Before touching the 12V battery, it's best practice to disconnect the "penthouse" connector. This prevents the DC-DC converter from supplying power during the swap and stops the car from trying to wake up mid-replacement.
- Fold down the rear seat (passenger side)
- Locate the orange high-voltage connector (the "penthouse")
- Unplug the connector—it simply pulls apart
- This isolates the HV system safely for service work
Step 3: Disconnect the Old Battery
- Use a 10mm socket to loosen the negative (black) terminal first
- Move the negative cable aside
- Loosen the positive (red) terminal
- Remove the positive cable
- Remove the battery hold-down bracket (10mm bolts)
- Carefully lift out the old battery
Step 4: Install the New Battery
- Lower the new battery into position
- Reinstall the hold-down bracket
- Connect the positive (red) terminal first
- Connect the negative (black) terminal last
- Tighten both terminals securely
Step 5: Reconnect and Reassemble
- Reconnect the penthouse connector under the rear seat
- Exit Transport Mode if you enabled it
- Replace the plastic cover in the frunk
- Reinstall the storage bin
- Close the frunk
- The car should wake up immediately
- Check for any warning messages on the screen
Model S and Model X
The process is similar but the battery location differs:
Model S (Pre-2021): Battery is located in the frunk, similar position to Model 3 Model S (2021+): Battery is under the rear seat Model X: Battery is under the second-row seats
For these models, you'll need to remove additional trim pieces to access the battery.
After Replacement
Once the new battery is installed:
- Let the car sit for 10-15 minutes to allow systems to initialize
- Check for error messages - some may need to be cleared
- Reset the BMS (Battery Management System) by leaving the car asleep for 8+ hours
- Update settings if any were reset (clock, driver profile, etc.)
How Long Does a Tesla 12V Battery Last?
- Lead-Acid batteries: 3-5 years typically
- Lithium batteries: 7-10+ years expected
- Frequent Sentry Mode use drains the 12V battery faster
- Extreme temperatures reduce lifespan
Common Mistakes to Avoid
- Connecting terminals in wrong order - Always negative last when connecting, negative first when disconnecting
- Using the wrong battery size - Tesla uses specific group sizes
- Not securing the hold-down - A loose battery can shift and short out
- Overtightening terminals - Can crack the battery posts
Cost Comparison
| Option | Cost | Notes |
|---|---|---|
| Tesla Service Center | $250-400+ | Labor + markup |
| DIY Lead-Acid | $80-120 | Easy, standard lifespan |
| DIY Lithium (OEM) | $200-300 | Longer lifespan |
| DIY Lithium (Ohmmu) | $300-350 | Premium option |
By doing this repair yourself, you save at least $100-200 compared to Tesla service, and you'll know exactly what battery was installed.
Have questions about this repair? The process is straightforward, but every car is slightly different. Always consult your owner's manual for model-specific details.
Official References
For the complete official procedure, see the Tesla Model 3 Service Manual - 12V Battery Replacement (requires Tesla account).
Related Guides
- Tesla Screen Black Fix - If your screen went dark before or after battery replacement
- Key Fob Battery Replacement - Another battery that needs periodic replacement
- Acceleration Issues - A failing 12V battery can cause power reduction
- Tesla Warning Lights & Error Messages Guide - Understand every warning on your Tesla screen

🛠️ Tools Needed for This Repair
These are the tools I personally use and recommend. Using quality tools makes the job easier and safer.
-
10mm Socket Wrench Set
-
Tesla 12V Replacement Battery (OEM Compatible)
-
Tesla 12V / 16V Battery (Original OEM) RR Car Parts 🇪🇺
-
Battery Terminal Cleaner
-
Plastic Pry Tools
-
iFixit Pro Tech Toolkit View on iFixit
-
iFixit Plastic Pry Tools View on iFixit
We earn commissions from qualifying purchases through our affiliate partners. This helps support the site at no extra cost to you.